Okay, listen up, because I’m about to let you in on a little secret: Apple pie bars are THE answer when you’re craving that warm, apple-cinnamon hug but don’t have all day to fuss with a full-blown pie. Seriously, these are like apple pie’s cool, laid-back cousin. They’re so easy, even *I* can’t mess them up (and trust me, I’ve had my share of baking fails!).
Hey, I’m [Your Name], and baking is my happy place. I love creating recipes that are both delicious and doable, and these apple pie bars? They’re a total winner. This recipe is a quick, easy twist on classic apple pie, and I’m so excited to share it with you!
Why You’ll Love These Apple Pie Bars
Seriously, there’s a million reasons to adore these apple pie bars, but let me give you the highlights. They’re just… perfect. Here’s why:
-
Quick and Easy Apple Pie Bars
Time is precious, right? These come together FAST. Way faster than a pie. I’m talking under an hour, start to finish!
-
Perfect Fall Dessert
That warm apple cinnamon smell? It screams autumn. These are amazing for potlucks, Thanksgiving, or just a cozy night in.
-
Family-Friendly Treat
Even the pickiest eaters gobble these up. They’re easy for little hands to hold, and who can resist a sweet apple treat?
Ingredients for the Best Apple Pie Bars
Alright, gather ’round! Here’s what you’ll need for these amazing apple pie bars. Don’t skimp on the good stuff, okay? These ingredients are what make these bars truly special.
- 1 1/2 cups all-purpose flour
- 1/2 cup cold unsalted butter, cubed (and I mean *cold* – straight from the fridge!)
- 1/4 cup granulated sugar
- 1/4 teaspoon salt
- 4-6 tablespoons ice water (yep, ice cold!)
- 4 cups peeled and sliced apples (Granny Smith or Honeycrisp are my go-tos). Slice them about 1/4 inch thick – not too chunky, not too thin.
- 1/2 cup granulated sugar
- 1/4 cup brown sugar
- 2 tablespoons all-purpose flour
- 1 teaspoon cinnamon (because what’s apple pie without cinnamon?)
- 1/4 teaspoon nutmeg (just a pinch!)
- 1 tablespoon lemon juice (brightens everything up!)
How to Make Apple Pie Bars: Step-by-Step Instructions
Okay, let’s get down to business! Don’t be scared – these apple pie bars are way easier than they look. Just follow these steps, and you’ll be munching on warm, apple-y goodness in no time!
Preparing the Crust for Apple Pie Bars
First things first, preheat that oven to 375°F (190°C). Trust me, a hot oven is key! Now, grab a large bowl and whisk together 1 1/2 cups of all-purpose flour, 1/4 cup of granulated sugar, and 1/4 teaspoon of salt. Okay, now for the fun part: the butter! Toss those cold, cubed butter pieces (1/2 cup, remember?) into the flour mixture. Use a pastry blender (or your fingers, if you’re feeling brave!) to cut the butter into the flour until it looks like coarse crumbs. You want little bits of butter still visible – that’s what makes the crust flaky!
Slowly add ice water, a tablespoon at a time (4-6 tablespoons total), mixing until the dough *just* comes together. Don’t overmix! You want it shaggy, not smooth. Think “beach hair,” not ” prom hair.”
Making the Apple Filling for Apple Pie Bars
While the dough chills out for a sec, let’s make that dreamy apple filling. In a separate, equally large bowl (because who wants apple pieces flying everywhere?), combine those 4 cups of peeled and sliced apples with 1/2 cup of granulated sugar, 1/4 cup of brown sugar, 2 tablespoons of all-purpose flour, 1 teaspoon of cinnamon (smell that amazingness!), 1/4 teaspoon of nutmeg, and 1 tablespoon of lemon juice. Toss everything together until the apples are evenly coated. The lemon juice keeps them from browning too much, plus adds a little zing!
Assembling and Baking Your Apple Pie Bars
Time to put it all together! Press half of the dough into the bottom of an ungreased 8×8 inch baking pan. Don’t worry if it’s not perfect – just get it as even as you can. Now, pour that apple mixture over the crust, spreading it out evenly.
Crumble the remaining dough over the apple filling. It doesn’t have to cover every single apple piece – rustic is good! Pop that pan into the preheated oven and bake for 30-35 minutes, or until the crust is golden brown and the apples are bubbly and tender. Keep an eye on it – ovens can be tricky!
Let the apple pie bars cool *completely* before cutting into squares. I know, it’s torture, but trust me, they’ll be much easier to cut and hold their shape better. Plus, the flavors meld together even more as they cool. Enjoy!
Tips for Perfect Apple Pie Bars
Want to take these apple pie bars from “good” to “OMG amazing?” Here are a few tricks I’ve learned along the way to make sure yours turn out perfect every single time. Trust me, these are worth it!
Chill the Dough for Easier Handling of Apple Pie Bars
Seriously, don’t skip this step! Chilling the dough for at least 30 minutes (or even longer!) makes it SO much easier to roll out and press into the pan. Warm dough is sticky and frustrating. Cold dough is your friend.
Use Cold Butter for a Flaky Crust in Your Apple Pie Bars
I can’t stress this enough: cold butter is KEY for a flaky crust. The cold butter creates little pockets of steam as it bakes, which results in those beautiful, flaky layers. So, keep that butter in the fridge until you’re ready to use it!
Prevent a Soggy Crust in Your Apple Pie Bars
Nobody wants a soggy bottom, right? To avoid that, make sure your oven is fully preheated before you pop those bars in. Also, don’t overfill the bars with apple filling – too much moisture can lead to a soggy crust. And, if you’re feeling extra cautious, you can even blind-bake the crust for 10 minutes before adding the filling. Voila! No more soggy crust worries!
Apple Pie Bars Variations
Okay, so you’ve nailed the basic recipe – awesome! Now, let’s get a little crazy and spice things up! These apple pie bars are super versatile, so feel free to experiment and make them your own. Here are a few ideas to get you started:
Add a Streusel Topping to your Apple Pie Bars
Want to add some extra crunch and sweetness? A streusel topping is the way to go! Just mix together 1/2 cup of flour, 1/4 cup of brown sugar, 1/4 cup of oats, and 1/4 cup of cold butter (cut into small pieces). Crumble it over the apple filling before baking. So good!
Use Brown Butter for a Nutty Flavor in your Apple Pie Bars
Brown butter takes everything to the next level, and these apple pie bars are no exception. To brown the butter, just melt it in a saucepan over medium heat, stirring constantly, until it turns a nutty brown color and smells delicious. Let it cool slightly before using it in the crust. It’s a game changer, trust me!
Incorporate Nuts for Extra Texture in your Apple Pie Bars
Nuts add a fantastic crunch and flavor to these bars. Try adding 1/2 cup of chopped walnuts, pecans, or almonds to the apple filling or sprinkling them on top before baking. Walnuts and pecans just scream “fall,” right?
Serving Suggestions for Apple Pie Bars
These apple pie bars are amazing all on their own, but if you want to take them to the next level, here’s what I do! A scoop of vanilla ice cream melting over a warm bar? Yes, please! Or, a drizzle of caramel sauce? Even better! Whipped cream is always a winner, too. Basically, anything goes!
Storing and Reheating Your Apple Pie Bars
Got leftovers? Lucky you! Store your apple pie bars in an airtight container at room temperature for up to 2 days, or in the fridge for up to 5 days. To reheat, just pop them in the microwave for a few seconds, or warm them up in a low oven. They’re yummy cold, too – just sayin’!
Frequently Asked Questions About Apple Pie Bars
Got questions? I’ve got answers! Here are some of the most common questions I get about my apple pie bars. Don’t worry, I’ve got you covered!
Can I use different types of apples for these Apple Pie Bars?
Absolutely! While I love Granny Smith and Honeycrisp for their tartness and crispness, you can totally experiment. Fuji, Gala, or even a mix of different apples would work great. Just make sure they’re firm enough to hold their shape while baking. Soft apples will turn to mush, and nobody wants mushy Apple pie bars!
How do I prevent the crust from getting soggy in Apple Pie Bars?
Ah, the dreaded soggy crust! Fear not! As I mentioned before, preheating your oven is key. Also, avoid overfilling the bars with the apple mixture. If you’re really worried, try blind-baking the crust for 10 minutes before adding the filling. That’s a classic tip for keeping your best Apple pie bars perfectly crisp!
Can I freeze Apple Pie Bars?
Yep! These easy Apple pie bars freeze beautifully. Just let them cool completely, then wrap them tightly in plastic wrap and foil (or pop them in a freezer-safe container). They’ll keep in the freezer for up to 2-3 months. When you’re ready to eat them, thaw them overnight in the fridge or at room temperature, then warm them up in the oven or microwave. Easy peasy!
How to make Gluten-Free Apple Pie Bars?
Want to make these gluten-free? No problem! Just substitute the all-purpose flour in the crust with a gluten-free all-purpose blend. Make sure it’s a blend that contains xanthan gum (that helps with the texture). You might need to add a little extra ice water to bring the dough together. And voila! Gluten-free homemade Apple pie bars for everyone!
Apple Pie Bars Recipe
Okay, you made it! Now go bake these amazing apple pie bars! And hey, if you loved them, please rate the recipe and leave a comment below! Share them with your friends, too – sharing is caring!
Print
Apple Pie Bars: 3 Simple Steps to Irresistible Flavor
- Prep Time: 20 minutes
- Cook Time: 35 minutes
- Total Time: 55 minutes
- Yield: 9 bars 1x
- Category: Dessert
- Method: Baking
- Cuisine: American
- Diet: Vegetarian
Description
These Apple Pie Bars are a simple and delicious twist on classic apple pie. They feature a buttery crust and a sweet apple filling, perfect for a quick dessert or snack.
Ingredients
- 1 1/2 cups all-purpose flour
- 1/2 cup cold unsalted butter, cubed
- 1/4 cup granulated sugar
- 1/4 teaspoon salt
- 4–6 tablespoons ice water
- 4 cups peeled and sliced apples (Granny Smith or Honeycrisp)
- 1/2 cup granulated sugar
- 1/4 cup brown sugar
- 2 tablespoons all-purpose flour
- 1 teaspoon cinnamon
- 1/4 teaspoon nutmeg
- 1 tablespoon lemon juice
Instructions
- Preheat oven to 375°F (190°C).
- In a large bowl, combine flour, sugar, and salt. Cut in cold butter until mixture resembles coarse crumbs.
- Gradually add ice water, 1 tablespoon at a time, until dough just comes together.
- Press half of the dough into the bottom of an 8×8 inch baking pan.
- In a separate bowl, combine apples, sugar, brown sugar, flour, cinnamon, nutmeg, and lemon juice.
- Pour apple mixture over the crust.
- Crumble the remaining dough over the apple filling.
- Bake for 30-35 minutes, or until golden brown.
- Let cool completely before cutting into bars.
Notes
- For a richer flavor, use brown butter in the crust.
- Add a streusel topping for extra crunch.
- Serve with a scoop of vanilla ice cream or a drizzle of caramel sauce.
Nutrition
- Serving Size: 1 bar
- Calories: 300
- Sugar: 25g
- Sodium: 150mg
- Fat: 12g
- Saturated Fat: 7g
- Unsaturated Fat: 4g
- Trans Fat: 0g
- Carbohydrates: 45g
- Fiber: 3g
- Protein: 3g
- Cholesterol: 30mg
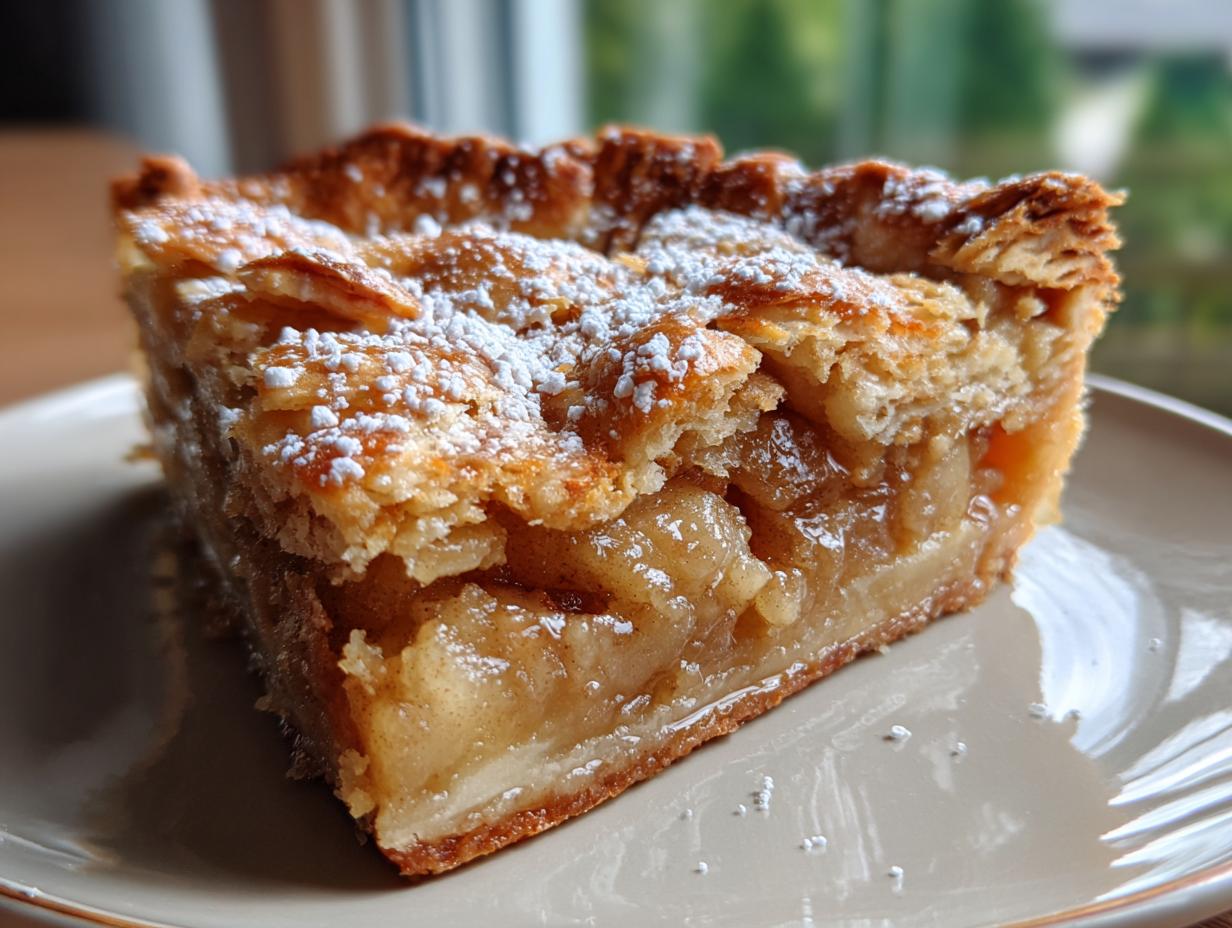
I am confused. The recipe calls for making this in an 8×8 pan, yet the picture of it shows a pie wedge. Can it be done either way?
Yes — this recipe is made in an 8×8 pan as bars, but you can definitely cut and serve them like pie wedges if you prefer that look! The flavor and texture stay just as delicious either way. 🍎🥧