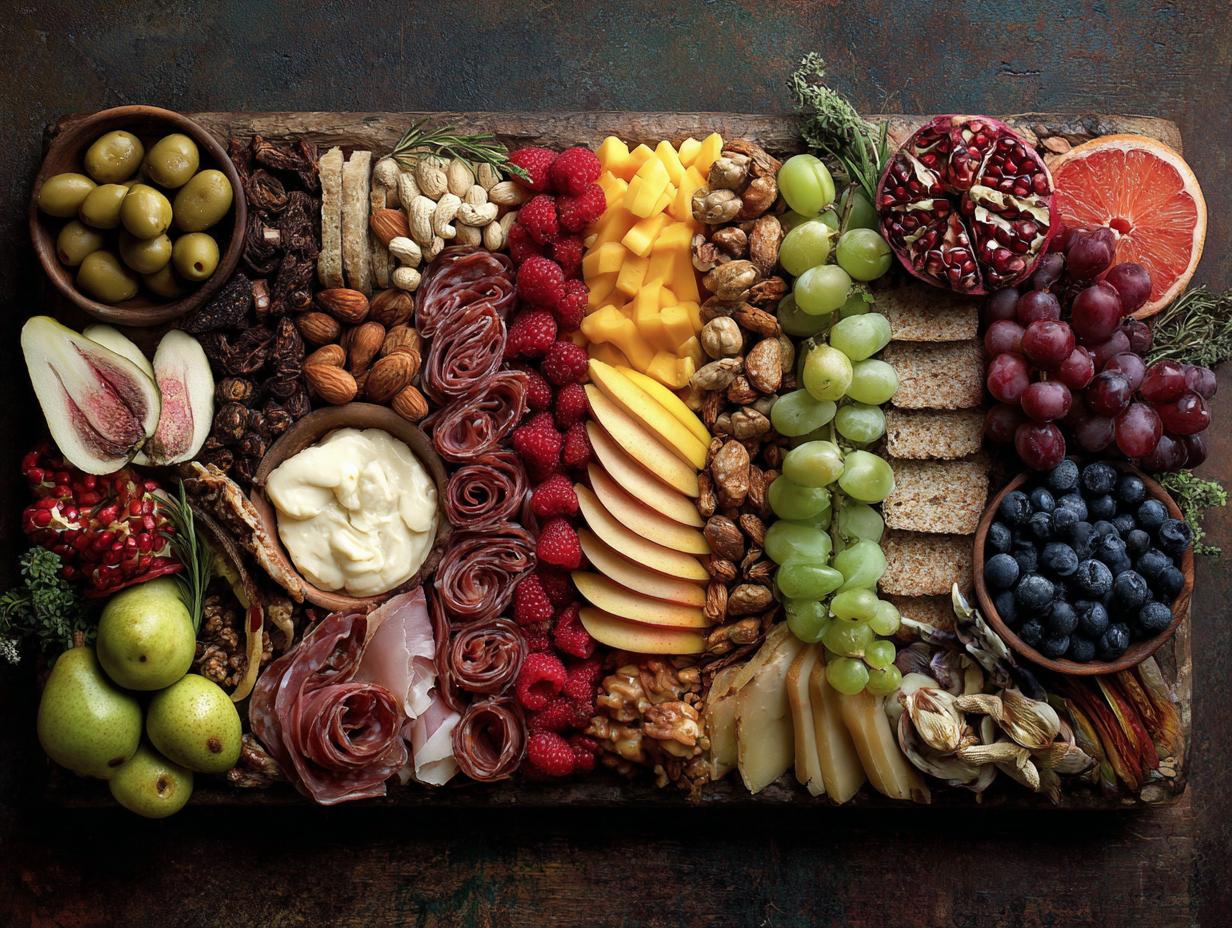
Okay, let’s be real – is there anything more inviting than a gorgeous charcuterie board? Seriously, when I see one, I just HAVE to dig in! You know, those artfully arranged spreads of cheese, meats, fruits… basically, a little bit of everything delicious. If you’re new to this, a charcuterie board is like a fancy snack plate, perfect for sharing (or, you know, not!).
And have you noticed how the “charcuterie board aesthetic” is totally blowing up on Pinterest? I’m obsessed! Everyone’s creating these stunning boards that are almost too pretty to eat. Almost. That’s exactly why I wanted to share my super simple guide to creating your *own* beautiful and, most importantly, tasty charcuterie board. Trust me, it’s easier than it looks!
I’ve been making charcuterie boards for years, and it’s honestly one of my favorite things to do when I have friends and family over. There’s just something so special about everyone gathered around, nibbling on different things and chatting. Plus, it looks like you spent hours slaving away, even though it only takes, like, 20 minutes. My secret? Presentation is everything!
Why You’ll Love This Charcuterie Board Aesthetic
Seriously, you guys, you’re gonna be obsessed with this charcuterie board! It’s not just about throwing some snacks on a board – it’s about creating a whole *vibe*. And the best part? It’s ridiculously easy. I promise!
Quick and Easy Assembly
Forget complicated recipes! This is literally just arranging delicious things on a pretty board. If you can open a package of crackers, you can make this. Seriously!
Visually Stunning Charcuterie Board Aesthetic
Okay, let’s be honest, we all want that Instagram-worthy spread, right? This guide will show you how to arrange everything so it looks like you’re a professional food stylist. Get ready for the likes!
Perfect for Any Occasion
Game night with friends? Romantic date night? Fancy holiday party? This charcuterie board works for EVERYTHING. Seriously, it’s the ultimate crowd-pleaser.
Customizable to Your Tastes
Don’t like salami? Swap it for prosciutto! Vegan? Load it up with veggies and plant-based cheeses! This board is all about *you* and what *you* love. That’s what makes it so amazing!
Ingredients for the Perfect Charcuterie Board Aesthetic
Alright, let’s talk ingredients! This is where the magic happens. Don’t stress too much about exact amounts – it’s all about eyeballing it and making it look good. But here’s a general guide to get you started. Remember, shop the sales and use what you love!
Cheeses
Gotta have cheese, right? I usually go for a mix of textures and flavors. Think about 4 oz of a sharp cheddar (cubed or sliced), a creamy brie (a wedge is perfect), and maybe a semi-hard gouda (sliced thinly). Pro tip: let your cheeses sit out for about 30 minutes before serving – they taste SO much better at room temp!
Cured Meats
Next up: meat! Salami is a classic (about 6 oz, sliced), but I also love adding some prosciutto for a little fancy flair. Pepperoni rounds are always a hit, especially if you’ve got kids around. Just grab a variety of about 6oz!
Crackers and Breads
You need something to pile all that cheese and meat on! Baguette slices are great (toast ’em lightly!), and then I usually add a mix of assorted crackers. If you’ve got gluten-free friends, don’t forget to grab some rice crackers or other gluten-free options. Usually about 8oz of combined crackers and bread is perfect!
Fresh Fruits
Grapes and berries are my go-to’s for adding a pop of color and sweetness. A cup of fresh raspberries is always a winner, and a bunch of red or green grapes looks so pretty. Apple slices are great too, especially in the fall! In the summer, think about adding some seasonal berries!
Olives and Pickles
Don’t forget the salty and briny stuff! A small bowl of green olives and another of black olives add a nice contrast. Cornichons (those tiny pickles) are always a fun addition, too! I usually use about 1/2 cup of olives and 1/4 cup of pickles.
Nuts
A handful of nuts adds some crunch and texture. Almonds, walnuts, and pecans are all great choices. You can use roasted or raw – whatever you prefer! I usually use about 1/4 cup.
Sweet Accompaniments
A little sweetness is the perfect finishing touch. A small jar of honey or jam (fig spread is amazing!) is perfect for drizzling over the cheese. Trust me, it’s a game-changer! Make sure you have a small spoon or spreader nearby!
Step-by-Step: Creating Your Charcuterie Board Aesthetic
Okay, here comes the fun part! Don’t overthink it – just relax and get creative. Remember, there’s no right or wrong way to do this! But I’ll give you my step-by-step guide for a guaranteed gorgeous charcuterie board aesthetic!
Choosing the Right Board for Your Charcuterie Board Aesthetic
First things first: the board itself! Wood is always a classic and rustic choice (I love my big wooden cutting board!). Slate gives it a sleek, modern vibe. Marble is super elegant, but can be a little slippery. Size-wise, think about how many people you’re serving. A smaller board is fine for a few friends, but go big if you’re having a party. I usually like to have a 12-18 inch board for up to 8 people.
Arranging the Cheeses
Cheese is the star of the show, so let’s start there. I like to place my cheeses in separate areas around the board, creating little “cheese zones.” If you’re using a wedge of brie, just leave it whole with a cheese knife. For cheddar, you can cube it or slice it into triangles. Pro tip: cutting the cheese into different shapes makes it look more interesting! Just make sure they’re spaced out evenly!
Adding the Cured Meats for a Charcuterie Board Aesthetic
Now for the meat! This is where you can get fancy. Instead of just plopping the salami down, try fanning it out in a semi-circle. You can roll prosciutto into little roses (so cute!). Folding the pepperoni into triangles also looks great! Don’t be afraid to play around with different patterns. It’s all about the aesthetic!
Filling in the Gaps with Crackers and Bread
Crackers and bread are basically the “filler” for your board, but they’re still important! I like to arrange them around the cheeses and meats, filling in any empty spaces. Vary the textures and shapes – stand some crackers up, lay others flat. Overlapping them a little creates a nice, abundant look.
Incorporating Fruits and Vegetables
Time for some color! I like to arrange my fruits and veggies in little clusters around the board. Grapes look great cascading down the side. Berries can be scattered around for a pop of brightness. Apple slices look pretty fanned out. And don’t forget to use seasonal fruits for an extra-fresh touch! I love using figs in the fall!
Adding Olives, Pickles, and Nuts
These are your salty and savory elements, and they add so much flavor! I like to put my olives and pickles in small bowls or ramekins to keep them from rolling all over the place. Then, I sprinkle nuts around the board, filling in any remaining gaps. The contrast between the salty and sweet is seriously amazing!
Drizzling Honey or Jam
Last but not least: the sweet touch! I put my honey or jam in a small bowl or ramekin and set it near one of the cheeses (brie and honey are a match made in heaven!). That way, people can easily drizzle it over their cheese and crackers. Trust me, this is the perfect finishing touch!
Tips for the Best Charcuterie Board Aesthetic
Want to take your charcuterie board from “meh” to “OMG!”? These little tips are game-changers. Trust me! It’s all about the details!
Prep Ahead for Easy Assembly
Seriously, the biggest time-saver ever: slice your cheeses and meats in advance! I usually do this a few hours before, wrap everything up tight, and pop it in the fridge. That way, when it’s party time, all you gotta do is arrange! Easy peasy!
Focus on Visual Appeal
Okay, this is where the “aesthetic” part really comes in. Think about color coordination! A mix of bright reds, greens, and oranges makes it look super inviting. And don’t be afraid to get creative with your arrangement. Layering, fanning, and scattering – it all adds to the visual feast!
Choose High-Quality Ingredients
This is HUGE. Seriously, the better the ingredients, the better the board. Skip the pre-shredded cheese and go for the good stuff. Fresh, flavorful fruits and veggies make a world of difference. Splurge a little – it’s worth it!
Ingredient Notes and Substitutions for Your Charcuterie Board Aesthetic
Okay, so maybe you’re not a cheddar fan, or you’re trying to keep things vegetarian. No worries at all! This charcuterie board is totally adaptable. Here are some easy swaps to make it perfect for *you*!
Cheese Substitutions
If you’re not feeling cheddar, brie, or gouda, no problem! Goat cheese is always a delicious and tangy alternative. For my vegan friends, there are tons of amazing plant-based cheeses out there now – Miyoko’s Kitchen makes some seriously incredible stuff. Just grab about 4oz to substitute!
Meat Substitutions
Going meatless? Awesome! Marinated artichoke hearts are a fantastic savory addition. Roasted vegetables (like bell peppers or zucchini) add tons of color and flavor. You can even add some grilled halloumi cheese for a salty, satisfying bite. Just make sure you have about 6oz of combined meat alternatives!
Cracker and Bread Substitutions
Got gluten sensitivities? No sweat! Rice crackers and seed crackers are great gluten-free options. You can also find gluten-free baguette slices at most grocery stores. Just make sure your gluten-free friends can enjoy the aesthetic, too!
Charcuterie Board Aesthetic: Frequently Asked Questions
Still got questions about creating the perfect charcuterie board aesthetic? Don’t sweat it! I’ve got you covered. Here are some of the most common questions I get asked, so you can build your board with confidence!
What is the best type of board to use for a charcuterie board aesthetic?
Okay, so the board is kinda key, right? I mean, it’s the canvas for your masterpiece! Honestly, there’s no *single* best board. It really depends on your style! Wood is classic and gives a rustic vibe. Slate is super chic and modern. Marble is elegant, but can be slippery. Size-wise, aim for a board that’s big enough to hold everything without feeling crowded. A 12-18 inch board is usually good for 6-8 people. Just pick what *you* love!
How much food do I need per person?
This is the million-dollar question! As a general rule, I usually plan for about 3-4 ounces of cheese, 2-3 ounces of meat, and a handful of crackers and other goodies *per person*. But honestly? It’s always better to have a little extra than not enough! Especially if you’ve got some serious snackers in the group!
Can I prepare a charcuterie board aesthetic ahead of time?
YES! Hallelujah! You can definitely prep some elements in advance to make things easier. Slice your cheeses and meats, wash your fruits and veggies. Wrap everything tightly and store it in the fridge. But I wouldn’t assemble the *entire* board more than a few hours ahead of time, or the crackers might get soggy. Nobody wants soggy crackers!
What are some good pairings for a charcuterie board aesthetic?
Ooh, pairings are my favorite! Think about contrasting flavors and textures. Sweet honey drizzled over salty cheese. Crunchy nuts alongside creamy brie. Tart pickles with rich salami. It’s all about creating a flavor explosion in your mouth! And don’t forget the drinks! Wine, beer, or even some sparkling cider are all great choices.
Nutritional Information for Charcuterie Board Aesthetic
Okay, let’s talk numbers! Since this is more of an “assembly” than a recipe, it’s tough to give exact nutritional info. But, based on the ingredients listed, here’s a *very* rough estimate per serving: Calories: 450, Fat: 30g, Protein: 20g, Carbs: 25g. Remember, this is just a ballpark – it all depends on what *you* put on your board!
Enjoy Your Delicious Charcuterie Board Aesthetic!
Alright, you did it! Seriously, I’m so excited for you to create your *own* stunning charcuterie board! Give it a try, and don’t forget to snap a pic and share it – I wanna see your creations! Tag me, and let me know what you think. Any tips or suggestions? I’m all ears!
Print
Master the Flawless Charcuterie Board Aesthetic in ONLY 20 Min
- Prep Time: 20 minutes
- Cook Time: 0 minutes
- Total Time: 20 minutes
- Yield: 6-8 servings
- Category: Appetizer
- Method: Assembly
- Cuisine: Mediterranean
- Diet: Gluten Free
Description
Create a visually appealing charcuterie board with these easy steps. This board is perfect for entertaining or a quick family dinner.
Ingredients
- Variety of cheeses (cheddar, brie, gouda)
- Cured meats (salami, prosciutto, pepperoni)
- Crackers and breads
- Fresh fruits (grapes, berries, apple slices)
- Olives and pickles
- Nuts (almonds, walnuts)
- Honey or jam
Instructions
- Choose a board surface (wood, slate, marble).
- Arrange cheeses in separate areas.
- Add cured meats in decorative patterns.
- Fill in gaps with crackers and bread.
- Place fruits and vegetables around the board.
- Add olives, pickles, and nuts.
- Drizzle honey or jam over cheeses.
Notes
- Use seasonal fruits for a fresh touch.
- Consider dietary restrictions when selecting items.
- Prepare elements ahead of time for easy assembly.
Nutrition
- Serving Size: 1 serving
- Calories: 450
- Sugar: 15g
- Sodium: 600mg
- Fat: 30g
- Saturated Fat: 15g
- Unsaturated Fat: 10g
- Trans Fat: 0g
- Carbohydrates: 25g
- Fiber: 3g
- Protein: 20g
- Cholesterol: 75mg