
Halloween’s coming, and you KNOW what that means: time to get spooky in the kitchen! I’m talking cobwebs, candy corn, and all sorts of ghoulish goodies. But let’s be real, some Halloween recipes are just… way too complicated. That’s where these mummy hand pies come in. They’re seriously the easiest, cutest, and tastiest things you can whip up for a Halloween party or just a fun afternoon with the kiddos. And the best part? You can totally customize them with whatever filling your heart desires!
I’m Casey Mitchell, and I’ve been baking up a storm in Texas for, well, forever! Halloween was always a big deal in my family. We’d spend weeks planning our costumes and decorating the house. And of course, no Halloween was complete without some homemade treats. These mummy hand pies are my take on a classic, made super simple and extra fun. Trust me, even if you’re not a baking pro, you can totally nail these!
Why You’ll Love These Mummy Hand Pies
Okay, so why should you try these little guys? Let me tell you, it’s not just because they’re adorable! Here’s the deal:
- They’re ridiculously easy.
- Super fast – perfect for busy parents (like me!).
- And seriously fun to make.
Quick and Easy Halloween Treat
Seriously, you just need a few ingredients (puff pastry is your BFF!) and a little bit of time. No fancy techniques required. I promise!
Customizable Mummy Hand Pies Filling
Apple? Pumpkin? Cherry? Chocolate? Go wild! Use your favorite pie filling or even some leftover jam. Anything works!
A Fun and Spooky Baking Project
Get the kids involved! They’ll love arranging the “bandages” and sticking on the candy eyes. It’s way more fun than carving pumpkins, if you ask me.
Ingredients for Your Mummy Hand Pies
Alright, let’s gather our supplies! Here’s what you’ll need to make these adorable mummy hand pies. Don’t worry, it’s a pretty short list!
Puff Pastry
You’ll need two sheets of store-bought puff pastry. The standard size works great, usually around 10×12 inches.
Pie Filling Choices for Mummy Hand Pies
Grab about a cup of your favorite pie filling. Apple and pumpkin are awesome for fall, but cherry or even some yummy jam works too! Store-bought is totally fine, or you can use homemade if you’re feeling fancy.
Egg Wash
Just one large egg will do the trick for that golden-brown color.
Candy Eyes
You’ll want some candy eyes to bring your mummies to life! You can find these at most grocery stores or craft stores, usually in the baking aisle.
How to Prepare Mummy Hand Pies: Step-by-Step Instructions
Okay, ready to get your mummy on? Here’s exactly how I make these cute little pies. Don’t worry, it’s easier than it looks!
Preparing the Puff Pastry for Mummy Hand Pies
First, gently unfold your puff pastry sheets. Then, using a knife or pizza cutter, slice them into rectangles. About 3×4 inches is a good size, but honestly, whatever works! We aren’t going for perfection here, just yummy mummies!
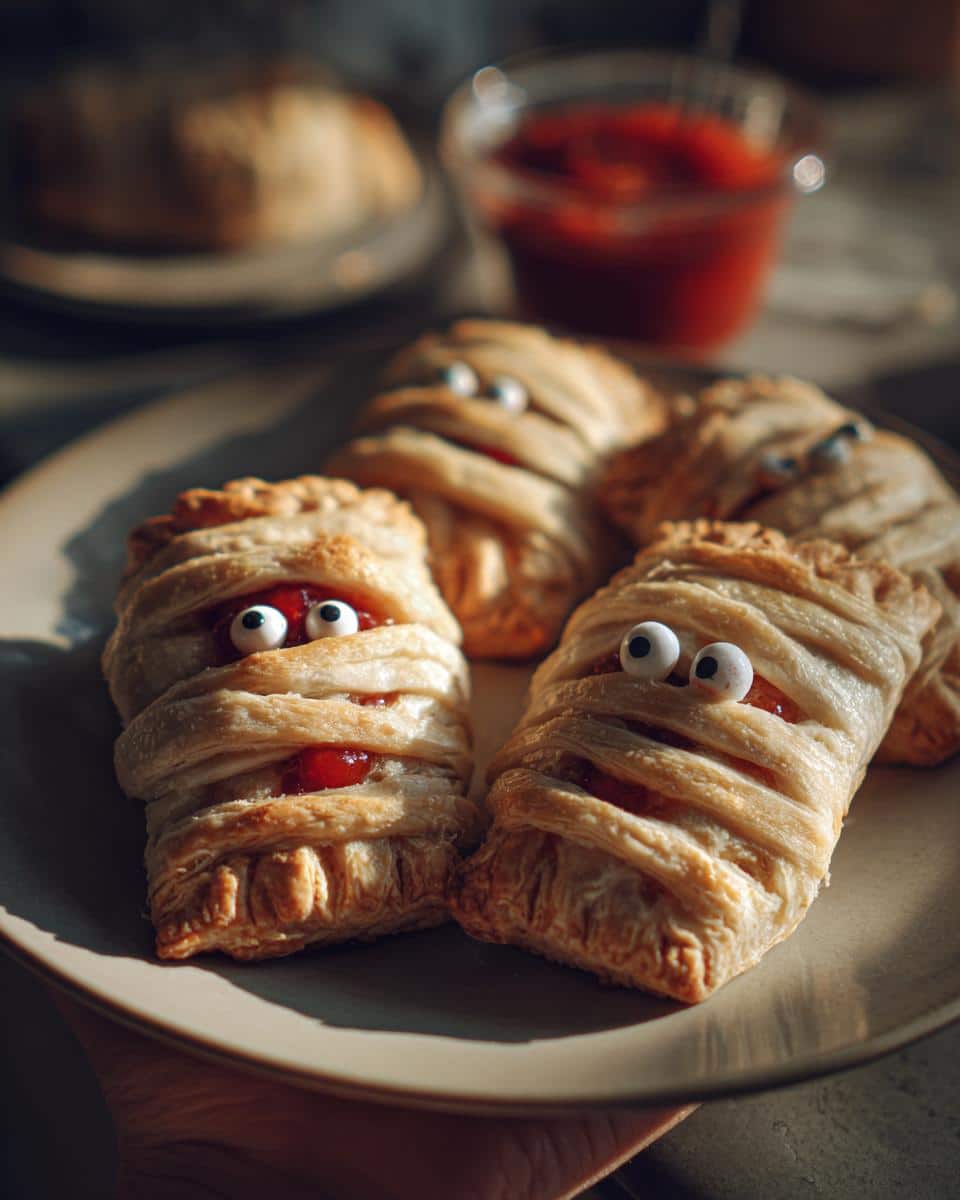
Filling and Bandaging Your Mummy Hand Pies
Now comes the fun part! Place a spoonful of your chosen filling in the center of each rectangle. Don’t overfill, or you’ll have a sticky mess! Next, cut thin strips of puff pastry for the bandages. Lay them across the filling, overlapping a bit, leaving a little space at the top for those candy eyes to peek through. Get creative – no two mummies are the same!
Baking the Mummy Hand Pies
Preheat your oven to 375°F (190°C). Brush each mummy hand pie with your beaten egg – this gives them that beautiful golden-brown color. Bake for about 15-20 minutes. You’ll know they’re done when the pastry is puffed up and golden. Keep an eye on them; ovens can be tricky!
Adding the Finishing Touches to Your Mummy Hand Pies
Let the pies cool slightly before adding the candy eyes. A dab of extra egg wash or a tiny bit of icing works great to stick them on. And there you have it – adorable, spooky, and delicious mummy hand pies!

Tips for Perfect Mummy Hand Pies
Want to take your mummy hand pies from cute to AMAZING? Here are a few little tricks I’ve learned along the way!
Preventing Soggy Mummy Hand Pies
Nobody likes a soggy bottom! Line your baking sheet with parchment paper – it makes a HUGE difference. And resist the urge to overfill those pies; a little goes a long way!
Enhancing the Flavor of Your Mummy Hand Pies
A pinch of cinnamon or nutmeg in your filling can really boost the flavor. Or, for a little extra sweetness and sparkle, sprinkle the pies with cinnamon sugar before baking. My favorite part is the sugary crust!
Achieving Golden-Brown Mummy Hand Pies
Make sure your oven is heated evenly. And don’t skip the egg wash! It’s what gives those mummies that gorgeous golden glow. Brush it on evenly for best results!
Variations on Mummy Hand Pies
Okay, so you’ve mastered the basic mummy. Now what? Let’s get creative! These little guys are SO easy to adapt. Here are a few of my favorite twists:
Apple Mummy Hand Pies
Use apple pie filling (store-bought or homemade, you do you!). A little extra cinnamon and nutmeg takes it to the next level. Trust me, it’s like autumn in every bite!
Pumpkin Mummy Hand Pies
Pumpkin pie filling is another fall favorite! Add a dash of pumpkin pie spice for extra warmth. It’s basically pumpkin pie, but way cuter (and easier!).
Jam Filled Mummy Hand Pies
In a rush? Grab your favorite jam! Raspberry, strawberry, apricot… they all work! This is the quickest way to get your mummy fix, and it’s surprisingly delicious.
FAQ About Mummy Hand Pies
Got questions about making these spooky treats? I’ve got answers! Here are a few things I get asked all the time about my mummy hand pies.
Can I use homemade pie dough for mummy hand pies?
Totally! While I love the convenience of puff pastry, homemade pie dough works great too. Just roll it out thin and follow the same steps. It’ll give you a more rustic, “homemade” vibe. Plus, you can use your favorite recipe! Just make sure it’s chilled before you start cutting out those mummy strips!
How do I store leftover mummy hand pies?
If you have any leftovers (which is rare!), store them in an airtight container at room temperature for a day or two. They’re best eaten fresh, but they’ll still be tasty! You can also pop them in the fridge, but the crust might get a little softer. A quick warm-up in the oven or air fryer will crisp them right back up!
Can I make mummy hand pies in an air fryer?
You bet! Air fryer mummy hand pies are SO easy and quick. Preheat your air fryer to 350°F (175°C). Place the pies in the basket, making sure they aren’t touching. Cook for about 8-10 minutes, or until golden brown. Keep a close eye on them, as air fryers can cook quickly! This is a great way to get that crispy, flaky crust in a flash.
Serving Suggestions for Mummy Hand Pies
Okay, you’ve got your adorable mummy hand pies… now what? Here are a few fun ideas to make them even more spooktacular!
Pairing Mummy Hand Pies with Drinks
A cold glass of milk is always a winner! Or, for a cozy treat, try them with coffee or hot chocolate. Yum!
Creating a Halloween Dessert Platter with Mummy Hand Pies
Pile them high on a platter with other Halloween goodies like candy corn, ghostly cookies, and maybe some gummy worms. Spooky AND delicious!
Garnishing Mummy Hand Pies
A dusting of powdered sugar makes them look extra ghostly. Or, add some Halloween sprinkles for a pop of color! So fun!
Nutritional Information for Mummy Hand Pies
Okay, quick note about nutrition! Just keep in mind that the nutritional information for these mummy hand pies can vary A LOT depending on the exact ingredients you use (brands, fillings, etc.). So, I can’t give you super precise numbers, unfortunately!
Enjoyed These Mummy Hand Pies?
Yay, so glad you gave these a try! If you loved making (and eating!) these mummy hand pies, I’d be thrilled if you left a comment below. Don’t forget to rate the recipe, too! And if you share them on social media, tag me – I’d LOVE to see your spooky creations!
Print
Wicked Mummy Hand Pies in Under 30 Minutes
- Prep Time: 20 minutes
- Cook Time: 20 minutes
- Total Time: 40 minutes
- Yield: 6-8 hand pies 1x
- Category: Dessert
- Method: Baking
- Cuisine: American
- Diet: Vegetarian
Description
These mummy hand pies are a fun and spooky treat, perfect for Halloween. They are easy to make and customize with your favorite fillings.
Ingredients
- 2 sheets of store-bought puff pastry
- 1 cup of your favorite pie filling (apple, cherry, pumpkin, etc.)
- 1 egg, beaten
- Candy eyes
Instructions
- Preheat your oven to 375°F (190°C).
- Unfold the puff pastry sheets and cut them into rectangles.
- Place a spoonful of pie filling in the center of each rectangle.
- Cut thin strips of puff pastry to create the mummy’s bandages.
- Arrange the strips over the filling, leaving a small space for the eyes.
- Brush the mummy hand pies with beaten egg.
- Bake for 15-20 minutes, or until golden brown.
- Let cool slightly and attach candy eyes with a dab of egg or icing.
Notes
- You can use any pie filling you like.
- Get creative with the mummy bandage design.
- For a sweeter pie, sprinkle with sugar before baking.
Nutrition
- Serving Size: 1 hand pie
- Calories: 250
- Sugar: 15g
- Sodium: 150mg
- Fat: 12g
- Saturated Fat: 6g
- Unsaturated Fat: 5g
- Trans Fat: 0g
- Carbohydrates: 30g
- Fiber: 2g
- Protein: 3g
- Cholesterol: 30mg