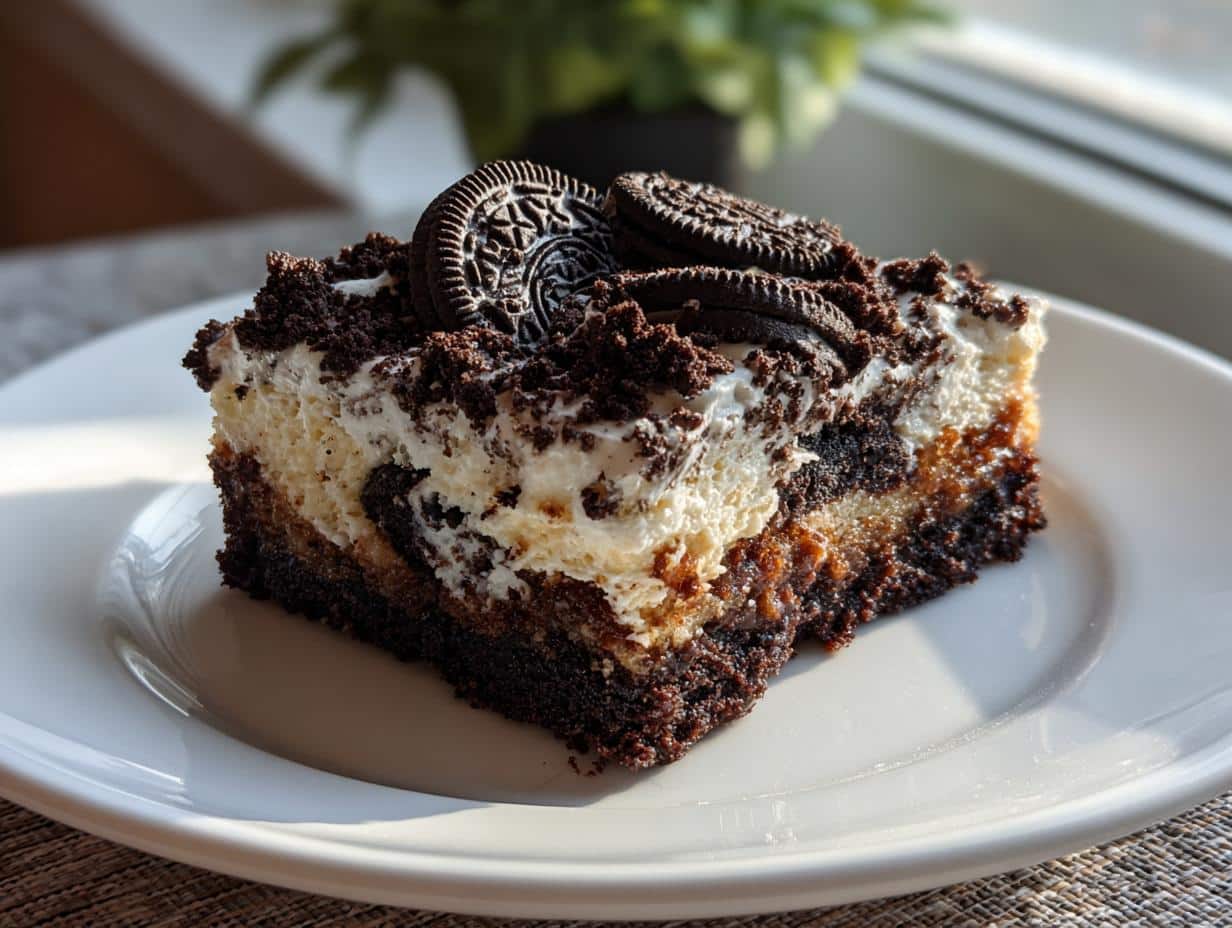
Okay, y’all, let’s talk about the dessert that’s gonna be EVERYWHERE this season: Oreo Dump Cake! I’m talkin’ the easiest, most festive, and totally family-friendly treat you can whip up. Seriously, dump cakes are my love language, and this Oreo version? It’s pure magic. As your girl Casey Mitchell from Texas, I’m here to tell ya, this Oreo Dump Cake is about to become your new holiday go-to!
Why You’ll Love This Oreo Dump Cake
Listen, there’s a million reasons why this is gonna be your new fave. But here’s the highlights:
- Super easy – like, *dump* it and bake easy!
- Crazy quick – ready in under an hour!
- Totally customizable – add your own twist!
- A guaranteed crowd-pleaser – everyone loves Oreos!
- Perfect for any holiday – or, ya know, a Tuesday.
- Looks gorgeous! Seriously, Pinterest-worthy.
Reasons to bake this Oreo Dump Cake!
Okay, so why *this* Oreo Dump Cake? Well, first off, it’s ridiculously simple. I’m talkin’ minimal effort, maximum flavor. Plus, that rich, chocolatey Oreo taste? Irresistible! Trust me, this cake is a total showstopper that’ll have everyone begging for the recipe. It’s just so easy to throw together, and everyone will be so impressed! It’s the perfect way to make a delicious dessert with minimal stress.
Ingredients for Your Oreo Dump Cake
Alright, let’s gather everything we need! Here’s what you’ll want to grab for this ridiculously easy Oreo Dump Cake:
- 1 package (15-16 oz) Oreo cookies, roughly chopped. Don’t stress about making them perfect!
- 1 box (15.25 oz) chocolate cake mix. Any brand works, just grab your favorite!
- 1 cup milk. I usually go for whole milk, but whatever you have on hand is totally fine.
- ½ cup (1 stick) unsalted butter, melted. Gotta have that buttery goodness!
- 1 can (14 oz) sweetened condensed milk. This is the secret to the gooey-ness, don’t skip it!
- Optional: A handful of chocolate chips or Oreo crumbs for topping. Because, why not?
See? Nothing too crazy, right? Let’s get this show on the road!
How to Make Oreo Dump Cake: Step-by-Step Instructions
Okay, here’s the super-easy part! Just follow these steps, and you’ll be munching on Oreo Dump Cake in no time. Seriously, it’s almost too easy!
- First things first: Preheat your oven to 350°F (175°C). You’ll want it nice and hot before we get started.
- Grab a 9×13 inch baking dish and lightly grease it. This will keep the cake from sticking and make serving a breeze. Trust me, you don’t wanna skip this step!
- Now, spread those chopped Oreos evenly across the bottom of the dish. This is gonna be the yummy Oreo base!
- Pour that can of sweetened condensed milk evenly over the Oreos. This is where the magic happens, folks!
- Sprinkle the dry chocolate cake mix evenly over the sweetened condensed milk. Don’t stir! We’re going for that dump cake vibe, remember?
- Pour the milk evenly over the cake mix. Again, no stirring! Just kinda drizzle it around so everything gets a little wet.
- Drizzle the melted butter evenly over the top of the cake mix. Try to get it all covered, but don’t stress too much if you miss a spot or two.
- If you’re feeling fancy, sprinkle some extra chocolate chips or Oreo crumbs on top. Totally optional, but highly recommended!
- Bake for 30-35 minutes, or until the top is golden brown and the cake is set. Keep an eye on it – ovens can be a little quirky!
- Let it cool for at least 15 minutes before serving. This lets everything set up perfectly. I know, it’s hard to wait, but trust me, it’s worth it!
And that’s it! Seriously, how easy was that? Now grab a fork and dig in! You deserve it!
Tips for the Best Oreo Dump Cake
Okay, wanna take your Oreo Dump Cake from good to *amazing*? Here’s a few little secrets I’ve picked up over the years: Use good quality butter – it really makes a difference! Don’t overbake it – a slightly gooey center is what you’re going for. And seriously, don’t skip the cooling time! Patience is a virtue, y’all!
Ensure a perfect Oreo Dump Cake every time!
Worried about messing it up? Don’t be! For extra gooeyness, try adding a tablespoon or two of heavy cream to the sweetened condensed milk. If you see the top browning too quickly, just tent it with foil. And hey, if it comes out a little wonky, who cares? It’s gonna taste amazing anyway! That’s the beauty of dump cake, it is so easy to bake!
Oreo Dump Cake Variations and Add-Ins
Okay, so you’ve mastered the basic Oreo Dump Cake? Awesome! Now let’s get a little crazy and mix things up! How about a teaspoon of peppermint extract for the holidays? Or some chopped pecans for a little crunch? Maybe some peanut butter chips for a chocolate-peanut butter explosion? The possibilities are endless, y’all! Don’t be afraid to experiment and make it your own!
Creative ideas for your Oreo Dump Cake
Wanna get *really* wild? Try layering in some fresh raspberries or strawberries before baking. Or swirl in some Nutella for a hazelnut twist! You could even use different flavors of Oreos! Golden Oreos, anyone? Ooh, or those limited-edition flavors! The sky’s the limit!
Serving Suggestions for Your Oreo Dump Cake
Okay, so you’ve got this warm, gooey Oreo Dump Cake fresh from the oven. Now what? My absolute favorite is a big scoop of vanilla ice cream melting all over it. Yum! Whipped cream is also amazing. Or, if you’re feeling extra decadent, a drizzle of chocolate sauce? Go wild, y’all!
Storing Your Oreo Dump Cake
Okay, you somehow have leftover Oreo Dump Cake? Wow, I’m impressed! To keep it fresh, just cover it tightly with plastic wrap or transfer it to an airtight container. It’ll stay good in the fridge for about 3-4 days. I doubt it will last that long!
How to make sure your leftover Oreo Dump Cake is just as good!
Want that fresh-baked taste again? Warm a slice in the microwave for about 30 seconds. Or, pop it in a 350°F oven for a few minutes. Just be careful not to overdo it and dry it out! A little scoop of ice cream helps too!
Nutritional Information for Oreo Dump Cake
Okay, y’all, just a heads-up: nutritional info can vary based on brands and what you toss in. So, this is just a general idea, not an exact science, okay?
Common Questions About Oreo Dump Cake (FAQ)
Got questions about this crazy-easy Oreo Dump Cake? Don’t worry, I’ve got answers! Here’s a few things folks often ask me:
Can I use a different type of cookie in this Oreo Dump Cake?
Absolutely! While it won’t be an Oreo Dump Cake, you can swap ’em out for chocolate chip cookies, peanut butter cookies… whatever your heart desires!
How do I prevent my Oreo Dump Cake from being soggy?
Make sure you don’t overdo it with the milk! And definitely let it cool completely before slicing. That’ll help it set up perfectly.
Can I make this Oreo Dump Cake ahead of time?
Yep! Just bake it, let it cool, cover it tightly, and pop it in the fridge. It’s best within a day or two, though!
Can I freeze Oreo Dump Cake?
You *can*, but the texture might change a bit. Wrap it really well to prevent freezer burn. Thaw it completely before reheating.
Rate this Oreo Dump Cake Recipe
Okay, y’all, if you loved this super easy Oreo Dump Cake recipe, please leave a comment and rate it below! I just love hearing from you! And don’t forget to share it with your friends on social media! Your girl Casey Mitchell from Texas is all about spreading the joy of simple, flavorful recipes!
Print
Unbelievably Simple Oreo Dump Cake in Just 8 Steps
- Prep Time: 30 minutes
- Cook Time: 35 minutes
- Total Time: 1 hour 30 minutes
- Yield: 12 servings
- Category: Dessert
- Method: Baking
- Cuisine: American
- Diet: Vegetarian
Description
Make a gory and delicious Bloody Brain Cake for your Halloween party. This cake features a realistic brain design with red velvet cake and a strawberry glaze.
Ingredients
- Red velvet cake mix
- Eggs
- Oil
- Water
- Cream cheese frosting
- Gray food coloring
- Strawberry glaze
- Raspberry coulis (optional)
Instructions
- Prepare the red velvet cake according to package directions.
- Bake the cake in a brain-shaped mold or carve it into a brain shape after baking.
- Let the cake cool completely.
- Mix cream cheese frosting with gray food coloring.
- Frost the cake to resemble a brain.
- Drizzle strawberry glaze over the cake for a bloody effect.
- Add raspberry coulis for extra gore (optional).
- Refrigerate until ready to serve.
Notes
- Use a gelatin brain mold for a more detailed brain shape.
- Experiment with different shades of gray buttercream for a realistic look.
- Add edible glitter for a shiny, gruesome effect.
Nutrition
- Serving Size: 1 slice
- Calories: 450
- Sugar: 40g
- Sodium: 250mg
- Fat: 25g
- Saturated Fat: 15g
- Unsaturated Fat: 8g
- Trans Fat: 0.5g
- Carbohydrates: 55g
- Fiber: 1g
- Protein: 4g
- Cholesterol: 75mg