Okay, y’all, let’s talk about Oreo sushi! I know, I know, it sounds kinda crazy, but trust me on this one. It’s the *perfect* no-bake dessert when you want something fun, easy, and totally Instagrammable. Seriously, this stuff is Pinterest gold! Plus, who doesn’t love Oreos? This recipe is all about bringing a little comfort and creativity into your day, and that’s what I’m all about. You get that satisfying Oreo crunch with a creamy filling – it’s like a party in your mouth! I just adore simple recipes that bring a smile to everyone’s face, and this Oreo sushi definitely does the trick.
Hey there! I’m Casey Mitchell, and I’m so excited to share this recipe with you. I’m a home cook from Texas, and I’m all about simple, flavorful recipes inspired by my family and travels. Let’s get cooking!
Why You’ll Love This Oreo Sushi Recipe
Okay, so why *should* you make this Oreo sushi? Let me tell you – you’re gonna be obsessed! It’s seriously the best, and here’s why:
- Quick Prep, Major Payoff: Seriously, this takes like, what, 20 minutes to throw together? Perfect for when you need a dessert, like, *yesterday*.
- No Baking Required (Hallelujah!): It’s a no-bake recipe! That means no heating up the kitchen, which is a HUGE win, especially here in Texas.
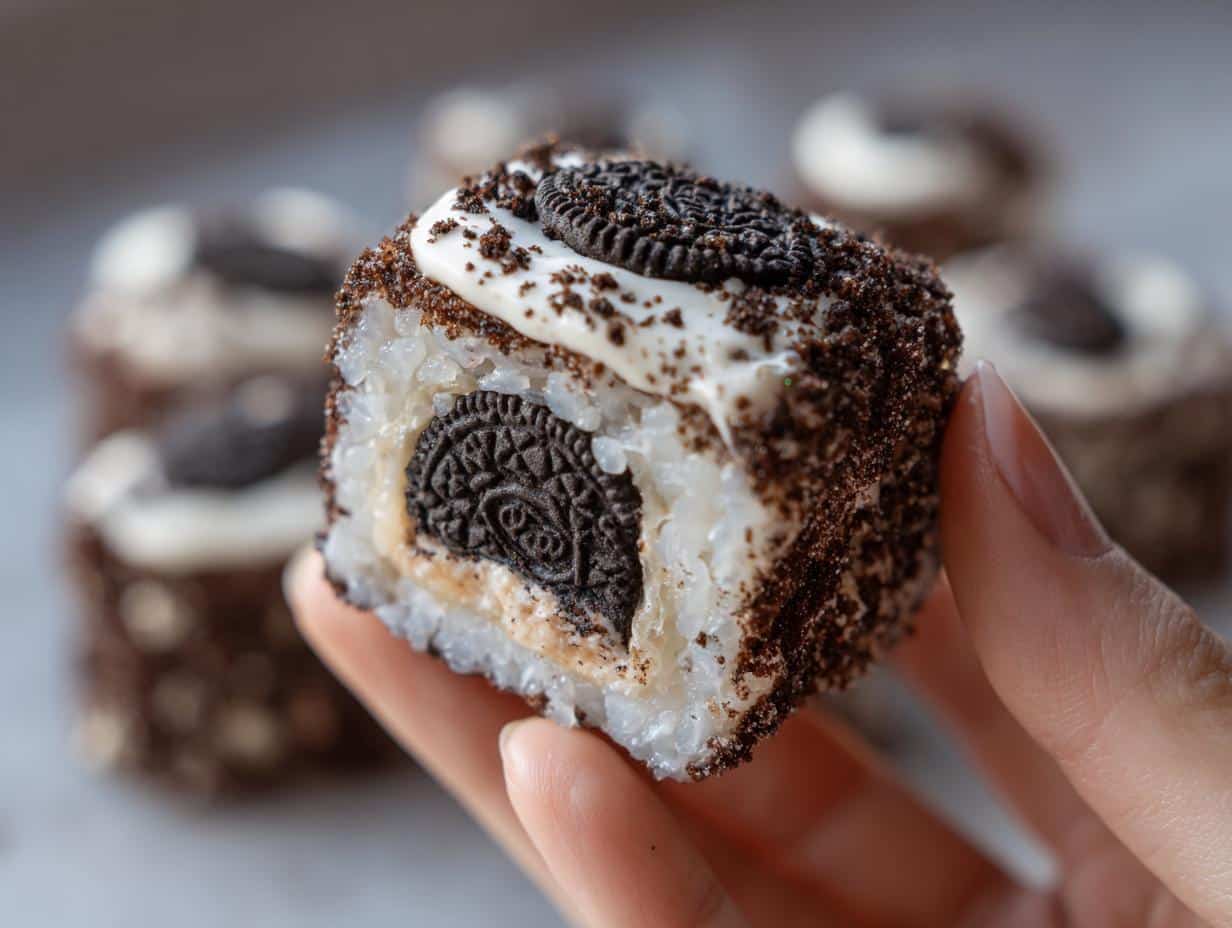
- Toppings Galore! Get Creative!: Sprinkles? Chocolate shavings? Shredded coconut? Go wild! This is your chance to get all fancy and make it your own. My favorite part is using crushed peppermint candies during the holidays!
- Fun for the Whole Fam: Kids LOVE helping make (and eat!) this stuff. It’s a great way to get them involved in the kitchen without, you know, a huge mess.
- Totally Insta-Worthy: Let’s be real, it looks amazing! Get ready for all the likes when you post pics of your beautiful Oreo sushi. It’s so visually appealing!
Ingredients for Your Oreo Sushi
Alright, let’s gather our supplies! Here’s what you’ll need to make this magical Oreo sushi:
- 36 Oreo cookies: Yep, the classic! Double Stuf? Go for it! Just make sure you have enough.
- 4 oz cream cheese, softened: Make sure it’s nice and soft, or you’ll have a lumpy mess. Nobody wants that!
- 2 tablespoons milk: Just a splash to bring it all together. I usually use whole milk, but whatever you have on hand is fine.
- Optional toppings: This is where you get to have some fun! I like to have a few options out so everyone can customize their own. Here are some ideas:
- Sprinkles (because, sprinkles!)
- Chocolate shavings (dark, milk, white – whatever you’re feeling!)
- Shredded coconut (adds a nice little something-something)
Ingredient Notes and Substitutions
Okay, so maybe you’re staring at that list and thinking, “Hmm, I wonder if I can swap this or that…” Well, let’s talk about it!
- Oreo Flavors: Okay, this is where it gets REALLY fun! Birthday cake Oreos? Peanut butter Oreos? Mint Oreos? The possibilities are endless! Just pick your fave and go for it. I’ve even tried Golden Oreos before, and it was surprisingly delicious!
- Cream Cheese Alternatives: If you’re not a cream cheese fan (gasp!), you could try using a vegan cream cheese alternative. I haven’t tried it myself, but I’ve heard good things! Just make sure it’s nice and soft. You could also try mascarpone cheese for a slightly sweeter, richer flavor.
How to Make Oreo Sushi: Step-by-Step Instructions
Alright, buckle up, buttercups! It’s time to get our hands dirty (in the best way possible!). Here’s how we’re gonna make this Oreo sushi magic happen:
Crushing the Oreos
First things first, we gotta turn those Oreos into a crumbly dream. You’ve got a couple of options here, so pick your poison!
- Food Processor: If you have one, this is the easiest way, hands down. Just toss the Oreos in and pulse until you’ve got fine crumbs. Boom! Done!
- Resealable Bag & Rolling Pin: No fancy gadgets? No problem! Pop those Oreos into a resealable bag (make sure it’s sealed tight!), and grab your rolling pin. Whack away until you’ve got crumbs. It’s kinda therapeutic, actually! Just aim for fine crumbs – you don’t want any big chunks.
Making the Oreo Dough
Okay, now for the fun part! We’re gonna turn those crumbs into a doughy masterpiece.
- Grab a large bowl and dump in your crushed Oreos.
- Add that softened cream cheese. Seriously, make sure it’s soft! Otherwise, you’ll be mixing forever.
- Pour in the milk.
- Now, get your hands in there (or use a spoon, if you’re fancy) and mix it all together until a dough forms. It should be nice and pliable, not too sticky. If it’s too dry, add a tiny bit more milk. If it’s too wet, add a few more Oreo crumbs. You’ll know it when you see it!
Rolling the Oreo Sushi
This is where it starts to look like actual sushi! Kinda, anyway…
- Lay down a sheet of parchment paper. This is KEY! Trust me on this.
- Plop your Oreo mixture onto the parchment paper.
- Put another sheet of parchment paper on top.
- Now, grab your rolling pin and roll that Oreo mixture into a thin rectangle, about ¼ inch thick. Try to keep it as even as possible. Don’t worry if it’s not perfect – we’re going for delicious, not professional!
- Carefully peel off the top sheet of parchment paper.
- If you’re using toppings, now’s the time! Sprinkle them evenly over the Oreo mixture.
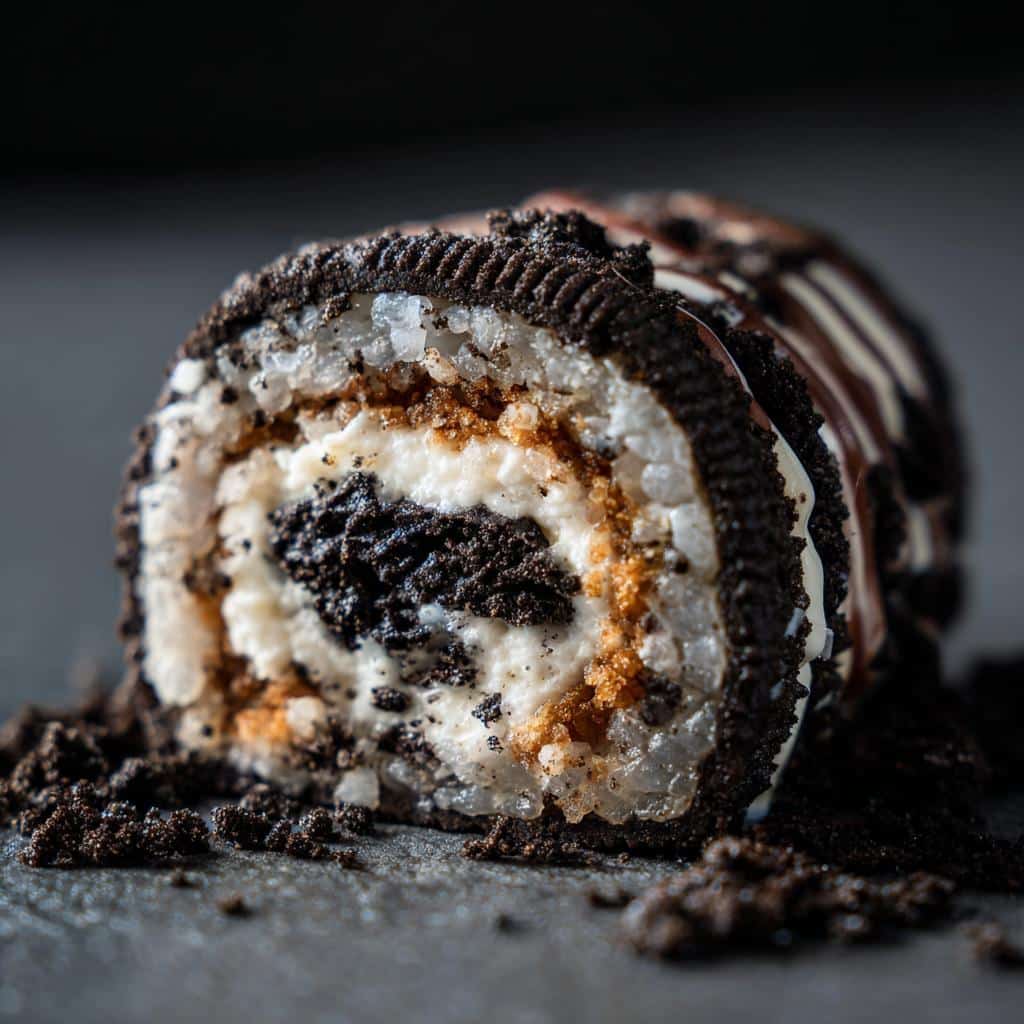
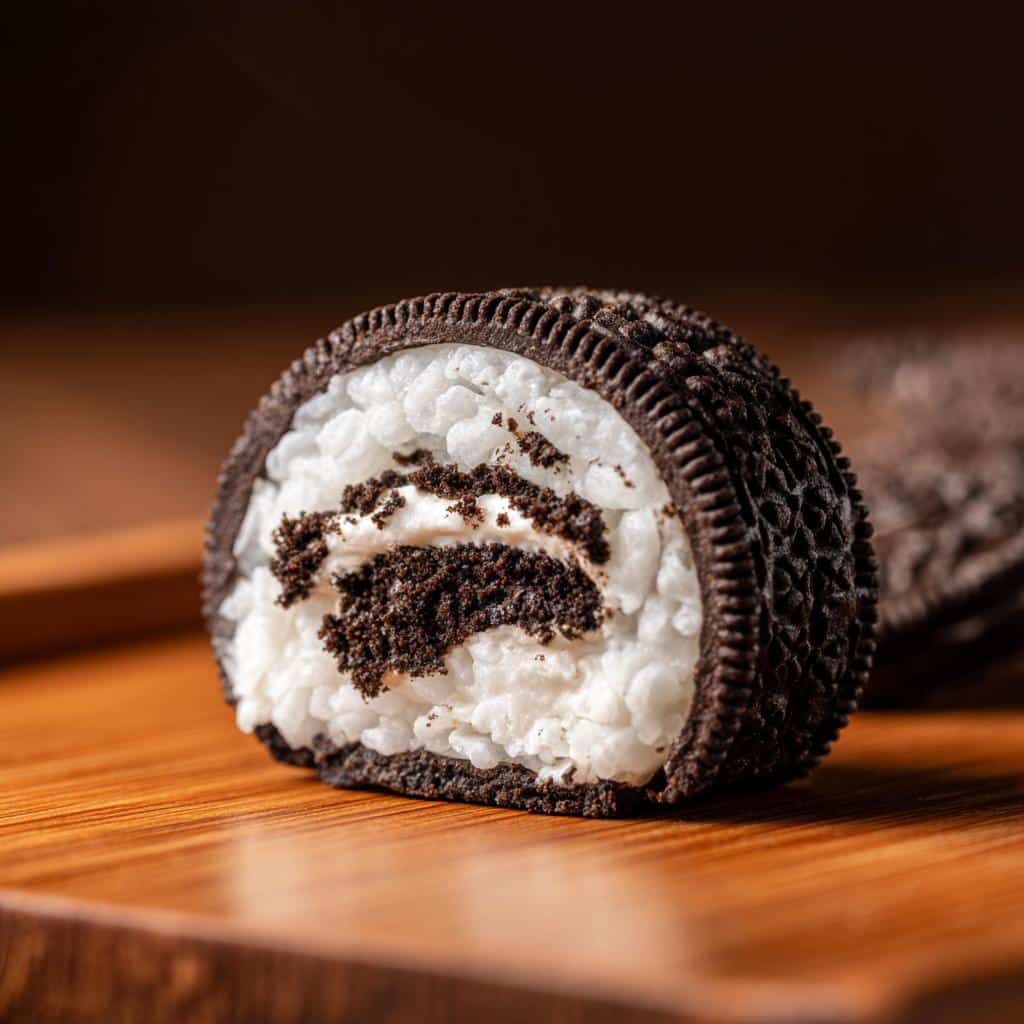
- Starting from one end, gently roll the Oreo mixture into a tight log, using the bottom sheet of parchment paper to help you. Try to keep it as snug as possible.
Chilling and Slicing
Almost there! Now we just need a little patience…
- Wrap that Oreo log *tightly* with plastic wrap. This is super important! We don’t want it drying out.
- Pop it in the refrigerator for at least 1 hour. This chilling time is crucial! It lets the log firm up so you can slice it nicely.
- Once it’s chilled and firm, take it out of the fridge and unwrap it.
- Grab a sharp knife and slice the Oreo log into sushi-like rolls, about ½ inch thick. Wipe the knife clean between slices for the prettiest results!
- Serve immediately and enjoy your adorable (and delicious!) Oreo sushi!
Tips for the Best Oreo Sushi
Okay, you’ve got the basics down, but let’s talk about some insider secrets to make your Oreo sushi *amazing*! These little tips will take your sushi game to the next level, trust me.
- Chill Out (Literally!): If you find your Oreo mixture is getting too sticky or hard to handle while you’re rolling, pop it in the fridge for, like, 10-15 minutes. A little chill time makes a HUGE difference! It firms up the mixture just enough to make rolling a breeze.
- Get Topping-Happy!: Seriously, don’t be shy! This is your chance to let your creativity shine. Mini chocolate chips? Yes! Chopped nuts? Absolutely! A drizzle of melted chocolate? Oh, HELL yes! Get creative and make it your own. My kids love helping with this part – it’s like decorating a tiny, delicious log!
Serving Suggestions for Oreo Sushi
Alright, you’ve made your beautiful Oreo sushi – now what? Don’t just shove ’em in your face (tempting, I know!). Let’s make it a *presentation*, people!
- Whipped Cream Dreams: A dollop of whipped cream on the side is always a good idea. It adds a little extra creamy sweetness that complements the Oreos perfectly. You can even get fancy and add a sprinkle of cinnamon or cocoa powder on top!
- Fruity Fun: Fresh fruit is a great way to balance out the richness of the Oreo sushi. Berries (strawberries, raspberries, blueberries – the works!) are my go-to. They’re colorful, tasty, and add a little healthy-ish vibe to the whole thing.
- Party Time!: This stuff is a total crowd-pleaser! Serve it as a dessert at parties, potlucks, or even just a fun family gathering. Arrange the sushi on a pretty platter, and watch it disappear! Trust me, it’s always a hit.
- Coffee’s Best Friend: Seriously, a few slices of Oreo sushi with your morning (or afternoon, or evening…) coffee? It’s a match made in heaven! The sweetness of the sushi is the perfect complement to a strong cup of joe.
How to Store Oreo Sushi
Okay, so you’ve made a batch of this awesome Oreo sushi, but somehow you have leftovers (I know, shocking, right?). Don’t worry, I got you covered! Here’s how to keep your sushi fresh and delicious:
- Airtight is Key: Pop those leftover rolls into an airtight container. Seriously, this is super important! You don’t want them drying out or getting all weird in the fridge.
- Fridge Time: Stash the container in the refrigerator. They’ll stay good for about 2-3 days, but let’s be real, they probably won’t last that long!
- Skip the Reheat: This is a cold treat, folks! No need to reheat these bad boys. Just grab ’em straight from the fridge and enjoy! They’re best served chilled.
Oreo Sushi Recipe Variations
Okay, so you’ve mastered the classic Oreo sushi. Now it’s time to get a little wild and experiment! This recipe is seriously begging for some creative twists, so let’s dive in!
- Cookie Crazy: Forget plain Oreos! Try using different types of cookies for a whole new flavor experience. Nutter Butters? Chocolate Chip Cookies? Even Girl Scout Thin Mints (if you’re feeling fancy!) would be amazing. Just crush ’em up and follow the recipe as usual. The possibilities are endless, y’all!
- Color Me Fun: Wanna make your Oreo sushi extra festive? Add a few drops of food coloring to the cream cheese mixture! Red and green for Christmas? Orange and black for Halloween? Rainbow colors for a birthday party? Go wild! Just be careful not to add too much, or your dough will get too wet.
- Extract-travaganza!: A little extract can go a long way in adding a burst of flavor! Vanilla extract is a classic, but peppermint extract would be amazing for the holidays. Almond extract? Delicious! Just add a few drops to the cream cheese mixture and mix well. Trust me, it’s a game-changer!
- Peanut Butter Bliss: Who doesn’t love peanut butter and Oreos? Mix a tablespoon or two of peanut butter into the cream cheese mixture for a rich, nutty flavor. You can even drizzle some melted peanut butter on top of the finished sushi for extra decadence!
Frequently Asked Questions About Oreo Sushi
Got questions about this crazy-delicious Oreo sushi? I got answers! Here are some of the most common things folks ask me:
Can I make Oreo Sushi ahead of time?
Absolutely! This is actually a great make-ahead dessert. You can totally whip up your Oreo sushi a day in advance. Just wrap it up tight and keep it in the fridge. It’ll be ready to slice and serve whenever you need it. Easy peasy!
Can I freeze Oreo Sushi?
Hmm, freezing is a tricky one. I wouldn’t really recommend it, to be honest. Freezing can sometimes mess with the texture of the cream cheese, and nobody wants gummy sushi! It’s best to just make it fresh (and eat it all up!).
What other toppings can I use for my Oreo Sushi?
Ooh, this is the fun part! The sky’s the limit, really! But if you need some inspo, how about:
- Mini chocolate chips (dark, milk, white – take your pick!)
- Chopped nuts (peanuts, almonds, pecans – whatever you’re in the mood for!)
- A drizzle of melted chocolate (because chocolate makes everything better!)
Seriously, get creative! It’s all about making it your own!
Estimated Nutritional Information for Oreo Sushi
Okay, so let’s talk numbers! Now, keep in mind that this is just an estimate, because, you know, it depends on exactly how big you slice your sushi and how crazy you get with the toppings. But here’s a rough idea of what you’re looking at (per serving – about 2 sushi rolls):
- Calories: ~150
- Sugar: ~15g
- Sodium: ~50mg
- Fat: ~8g
- Saturated Fat: ~5g
- Unsaturated Fat: ~2g
- Trans Fat: ~0g
- Carbohydrates: ~20g
- Fiber: ~1g
- Protein: ~1g
- Cholesterol: ~20mg
So, yeah, it’s a treat! But hey, everything in moderation, right? And it’s SO worth it!
Ready to Roll? Make Your Own Oreo Sushi Today!
Alright, my friends, are you ready to dive in and make some seriously awesome Oreo sushi? I know you are! It’s so easy, so fun, and so incredibly delicious – you absolutely HAVE to try it!
And hey, if you do make it (and I hope you do!), I’d love to hear what you think! Leave a comment below and let me know how it turned out. Did you try any fun variations? What were your favorite toppings? Spill the beans!
Oh, and don’t forget to rate the recipe! Your feedback helps other folks find this little slice of Oreo heaven. Plus, it makes me feel all warm and fuzzy inside!
And last but not least, if you’re proud of your creation (and you should be!), snap a pic and share it on social media! Tag me so I can see your amazing Oreo sushi masterpieces! Let’s spread the Oreo love far and wide!
Print
Astonishing Oreo Sushi Recipe in Just 20 Minutes
- Prep Time: 20 minutes
- Cook Time: 0 minutes
- Total Time: 1 hour 20 minutes
- Yield: About 24 sushi rolls 1x
- Category: Dessert
- Method: No-Bake
- Cuisine: American
- Diet: Vegetarian
Description
Oreo sushi is a sweet, no-bake treat. It combines crushed Oreos and cream cheese to mimic the look of sushi rolls.
Ingredients
- 36 Oreo cookies
- 4 oz cream cheese, softened
- 2 tablespoons milk
- Optional toppings: sprinkles, chocolate shavings, shredded coconut
Instructions
- Crush the Oreo cookies into fine crumbs using a food processor or by placing them in a resealable bag and crushing them with a rolling pin.
- In a large bowl, mix the crushed Oreos with the softened cream cheese and milk until a dough forms.
- Place the Oreo mixture between two sheets of parchment paper and roll it out into a thin rectangle.
- Carefully remove the top sheet of parchment paper. If using, sprinkle toppings over the Oreo mixture.
- Starting from one end, roll the Oreo mixture tightly into a log, using the bottom sheet of parchment paper to help.
- Wrap the Oreo log tightly with plastic wrap and refrigerate for at least 1 hour to firm up.
- Once chilled, slice the Oreo log into sushi-like rolls.
- Serve immediately and enjoy.
Notes
- For easier rolling, chill the Oreo mixture briefly before rolling.
- Get creative with your toppings.
Nutrition
- Serving Size: 2 sushi rolls
- Calories: 150
- Sugar: 15g
- Sodium: 50mg
- Fat: 8g
- Saturated Fat: 5g
- Unsaturated Fat: 2g
- Trans Fat: 0g
- Carbohydrates: 20g
- Fiber: 1g
- Protein: 1g
- Cholesterol: 20mg