Okay, y’all, get ready! Have you SEEN the peanut butter blossom cookies all over TikTok?! Seriously, they’re everywhere, and for good reason. These aren’t just any cookies; they’re like a little party in your mouth, and SO easy to make. I’m Casey, by the way, straight from Texas, where we know a thing or two about good food and having fun. And trust me, these are perfect for holidays, bake sales, or, you know, just a Tuesday when you need a little something sweet. They’re super simple, and I’m gonna show you how to make the *best* peanut butter blossom cookies EVER. Let’s get baking!
Why You’ll Love These Peanut Butter Blossom Cookies
Okay, so why are these cookies about to become your new fave? Let me break it down:
- Quick & Easy: Seriously, you can whip these up faster than you can say “peanut butter”! Perfect for when you need a sweet treat ASAP.
- TikTok Famous (for a reason!): They’re viral for a reason, y’all! Everyone’s making them, and you’re gonna want to jump on this bandwagon.
- Seriously Delicious: That peanut butter cookie with the chocolate Kiss? It’s a match made in heaven. My favorite part is that slightly salty-sweet combo!
- Crowd-Pleasing: Take these to any party or gathering, and watch them disappear. I’m telling you, they’re always a hit!
- Holiday Perfect: From Christmas to Valentine’s Day, these cookies are festive and fun. Plus, you can switch up the Kiss colors for any holiday!
- Great for Baking with Kids: Get the little ones involved! Rolling the dough and unwrapping Kisses? They’ll love it. Just watch out – they might sneak a few!
Ingredients for Your Peanut Butter Blossom Cookies
Alright, let’s talk ingredients! Here’s what you’ll need to make these little beauties:
- 1 cup creamy peanut butter (you know, the kind that’s smooth and dreamy!)
- 1/2 cup (1 stick) unsalted butter, softened. Make sure it’s *actually* soft, not melted!
- 1/2 cup granulated sugar
- 1/2 cup packed brown sugar (light or dark, your call!)
- 2 large eggs
- 1 teaspoon vanilla extract (the real stuff, if you got it!)
- 1 3/4 cups all-purpose flour
- 1 teaspoon baking soda
- 1/2 teaspoon salt
- Approximately 48 Hershey’s Kisses, unwrapped (this is where the fun begins!)
Ingredient Notes and Substitutions for Peanut Butter Blossom Cookies
Okay, let’s get into the nitty-gritty. A few things I’ve learned over the years…
- Peanut Butter: I always use creamy, but if you’re a chunky peanut butter fan, go for it! Just know it’ll change the texture a bit. Also, avoid the natural kind where the oil separates – those can make the cookies a little too dry.
- Butter: Softened butter is KEY. If it’s too cold, it won’t cream properly with the sugar. Too melted, and your cookies will spread like crazy. Aim for the consistency of mayonnaise. Seriously!
- Flour: All-purpose is what I usually grab, but if you’re gluten-free, a good gluten-free blend will work. Just watch the baking time, as they can sometimes bake a little faster.
- Feeling adventurous? Try almond butter or cashew butter instead of peanut butter! You can also swap out the vanilla extract for almond extract for a fun twist. I’ve even seen people use honey or maple syrup instead of sugar, but I haven’t tried it myself… yet!
How to Prepare Peanut Butter Blossom Cookies: Step-by-Step Instructions
Okay, here’s the lowdown on making these peanut butter blossom cookies. Don’t worry, it’s easier than it looks! Just follow these steps, and you’ll be golden.
Step 1: Making the Peanut Butter Blossom Cookies Dough
First things first, let’s get that dough going! In a large bowl (or the bowl of your stand mixer, if you’re fancy), cream together the softened butter, granulated sugar, and brown sugar until it’s light and fluffy. This usually takes about 2-3 minutes. Don’t rush it – this is where the magic happens! Next, beat in the eggs one at a time, then stir in the vanilla extract. In a separate bowl, whisk together the flour, baking soda, and salt. Gradually add the dry ingredients to the wet ingredients, mixing until *just* combined. Don’t overmix! You want a nice, soft dough.
Step 2: Shaping the Peanut Butter Blossom Cookies
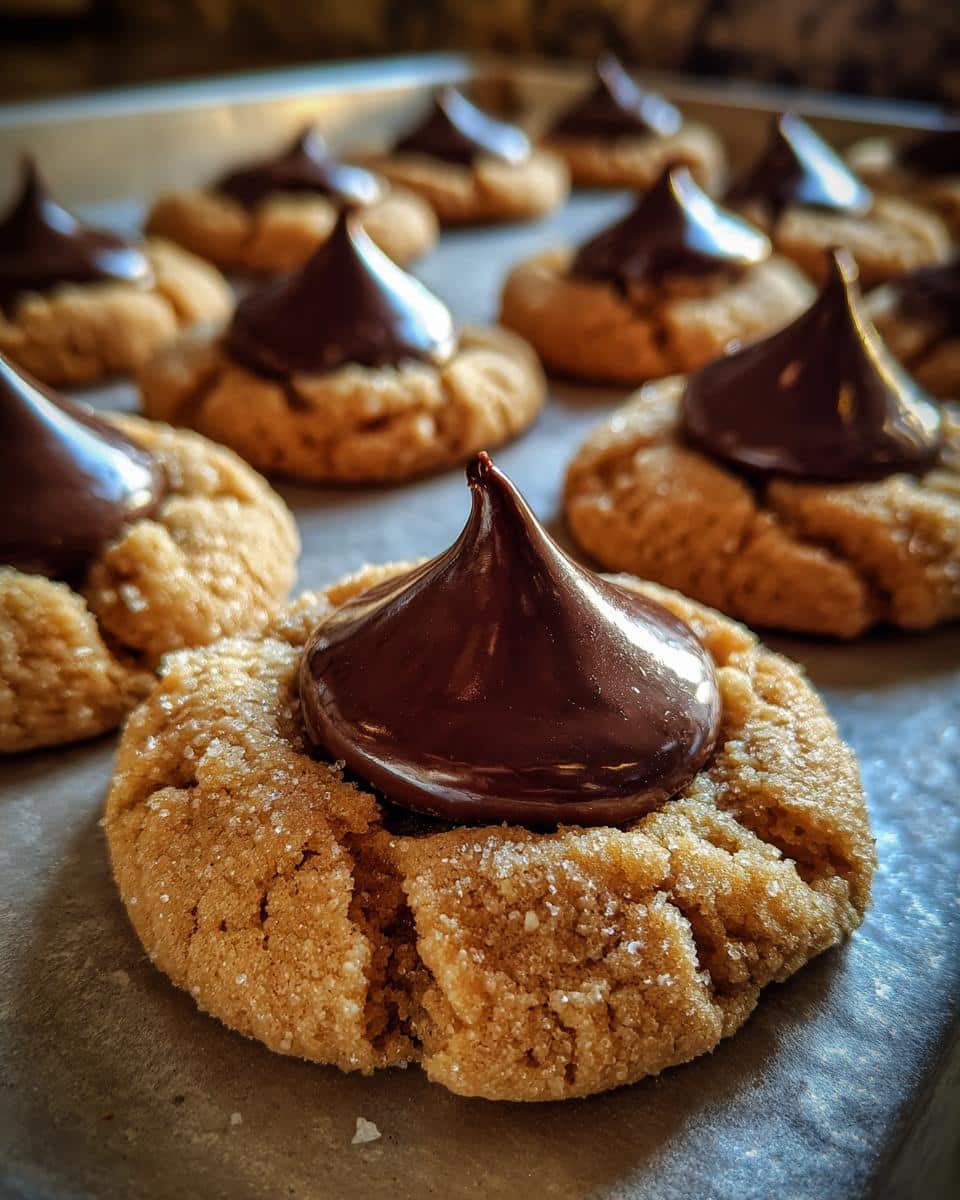
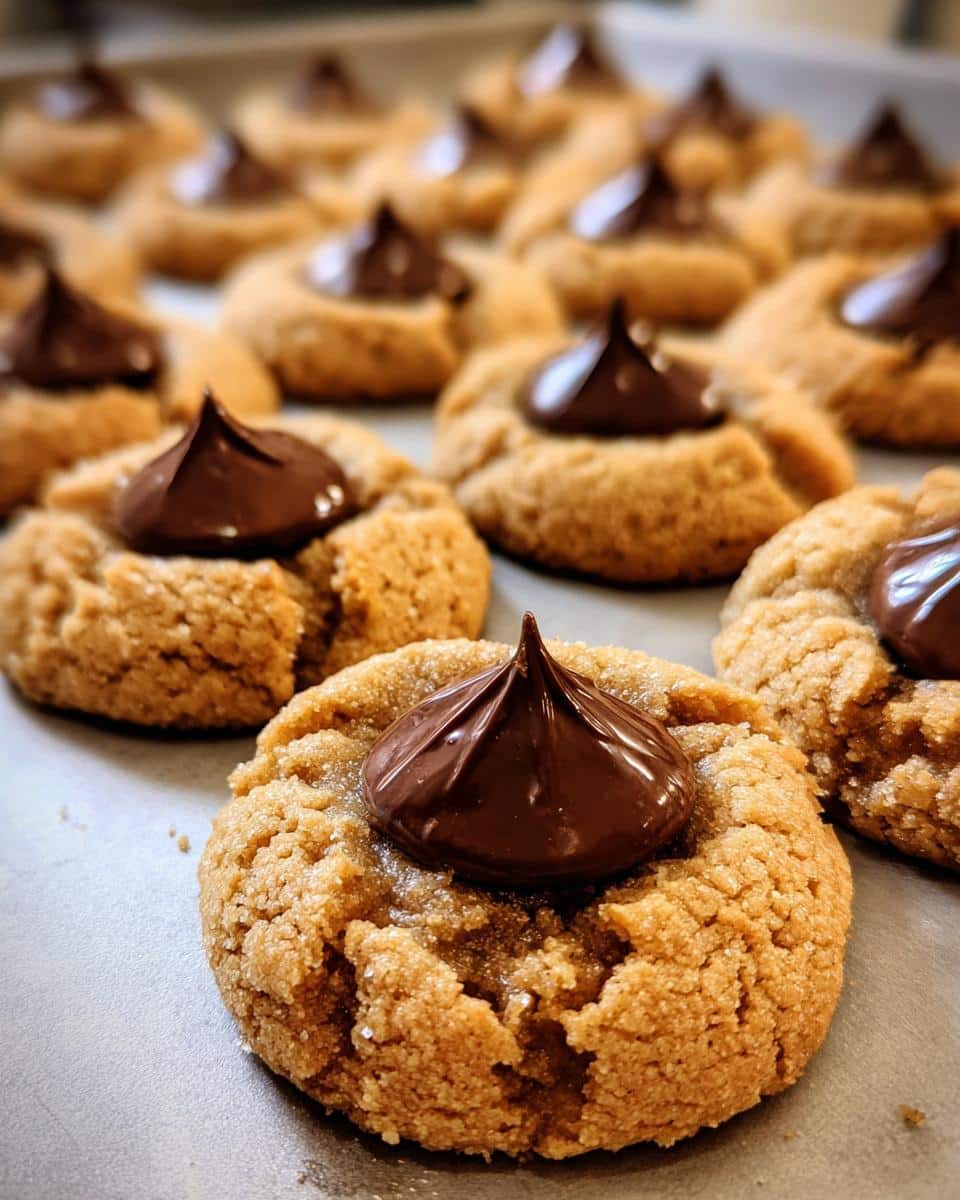
Now for the fun part! Grab a small cookie scoop (or just use a spoon) and roll the dough into 1-inch balls. Roll each ball in granulated sugar until it’s fully coated. This gives them that sparkly, festive look! Place the sugared dough balls on a baking sheet lined with parchment paper. This prevents sticking and makes cleanup a breeze! If the dough feels too sticky, pop it in the fridge for about 15-20 minutes to chill. This will make them easier to handle.
Step 3: Baking Your Peanut Butter Blossom Cookies
Preheat your oven to 375°F (190°C). Bake the cookies for 8-10 minutes, or until the edges are lightly golden brown. Keep a close eye on them – you don’t want to overbake them! They should still be soft in the center. Let them cool on the baking sheet for a couple of minutes before transferring them to a wire rack to cool completely.
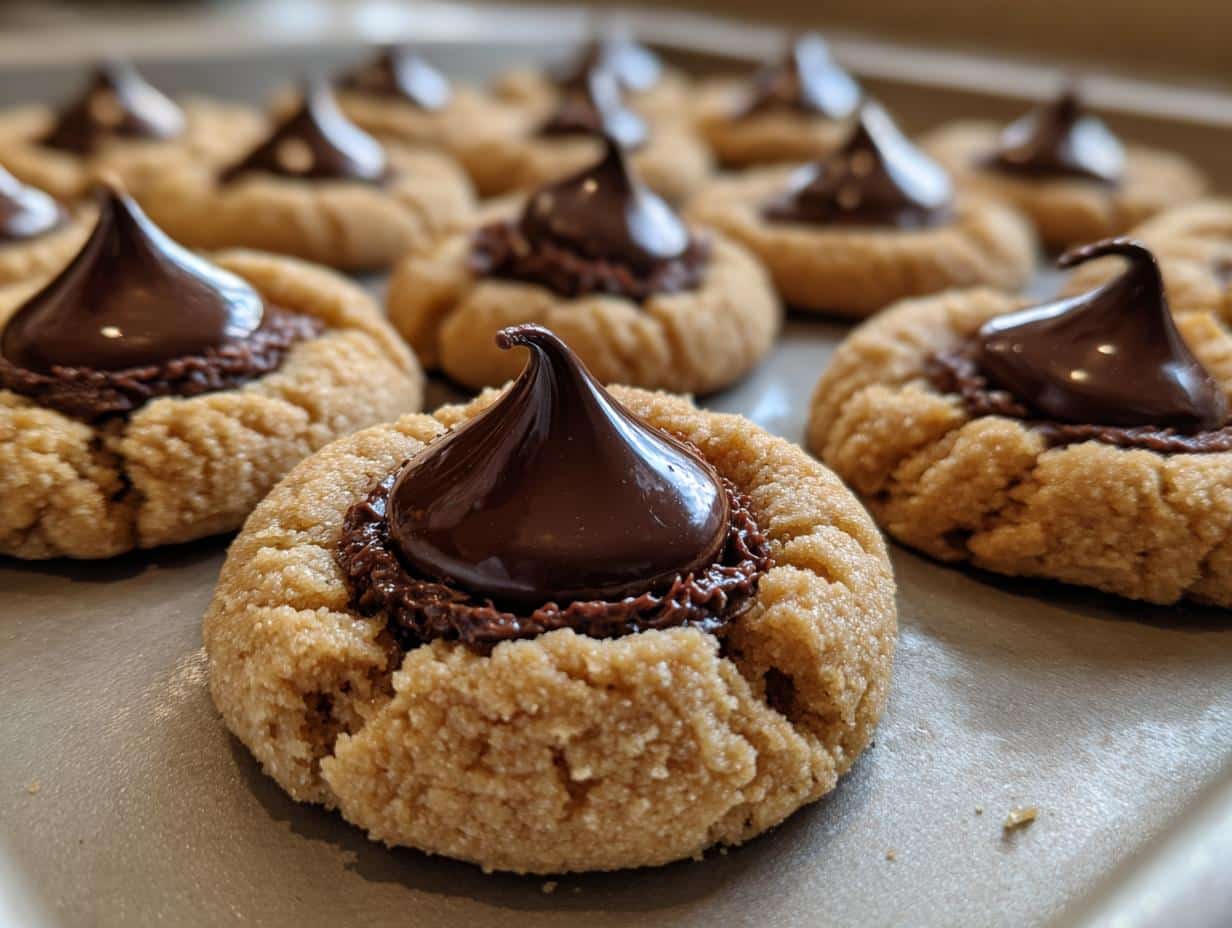
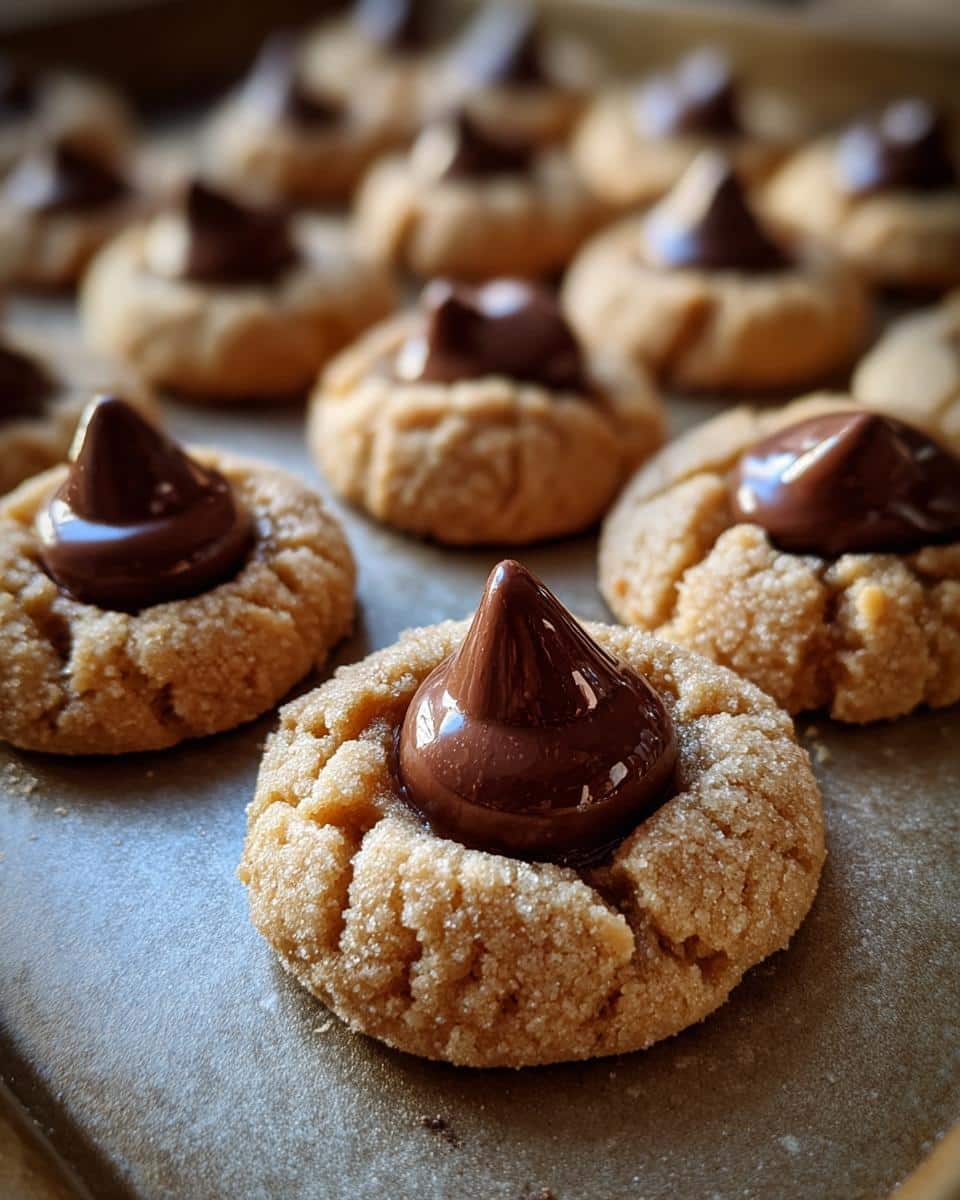
Step 4: Adding the Hershey’s Kisses to Your Peanut Butter Blossom Cookies
This is the most important step! As soon as the cookies come out of the oven, gently press a Hershey’s Kiss into the center of each cookie. Be careful not to press too hard, or the cookies might crack! The heat from the cookies will slightly melt the Kisses, so they’ll stick perfectly. If you’re not a fan of Hershey’s Kisses (gasp!), you can use other candies like chocolate stars or even mini peanut butter cups. Yum!
Tips for Perfect Peanut Butter Blossom Cookies
Okay, y’all, listen up! Want to take your peanut butter blossom cookies from “meh” to “WOW”? Here are my tried-and-true tips for baking perfection:
- Chill Out! Seriously, chilling the dough is non-negotiable. It helps prevent the cookies from spreading too thin and keeps them nice and puffy. I usually chill mine for at least 30 minutes, but even 15 minutes makes a difference.
- Parchment is Your Pal: Always, *always* line your baking sheets with parchment paper. Not only does it prevent sticking, but it also makes cleanup a breeze. Trust me, you’ll thank me later!
- Spread the Love (but not too much!): If your cookies are spreading too much, it could be a couple of things. Either your butter was too soft, or your oven temperature is off. Try chilling the dough longer and double-checking your oven temp.
- Soft & Chewy is the Goal: Nobody wants a dry, crumbly cookie! To keep your peanut butter blossoms soft, don’t overbake them. They should still be slightly soft in the center when you take them out of the oven. They’ll continue to set up as they cool.
- Kiss Placement is Key: Press those Hershey’s Kisses in *right* when the cookies come out of the oven. If you wait too long, the cookies will cool, and the Kisses won’t stick properly. And be gentle! You don’t want to crack the cookies.
Peanut Butter Blossom Cookies: Variations to Try
Alright, so you’ve mastered the classic peanut butter blossom cookie? Awesome! Now, let’s get a little crazy and try some fun variations. This is where you can really let your creativity shine!
- Extract Extravaganza: Swap out the vanilla extract for something a little different! Almond extract gives them a nutty, almost marzipan-like flavor. Or, try a little bit of peppermint extract for a festive holiday twist! Just a 1/4 teaspoon will do – a little goes a long way!
- Spice It Up! Add a pinch of cinnamon, nutmeg, or even a little bit of ginger to the dough for a warm, cozy flavor. I love adding a dash of cinnamon, especially around the holidays. It makes them smell AMAZING while they’re baking!
- Kiss Me, Kate (with Different Flavors!): Okay, this one’s a no-brainer. Hershey’s makes a TON of different Kiss flavors these days! Try using caramel-filled Kisses, dark chocolate Kisses, or even the candy cane Kisses around Christmas time. The possibilities are endless! My personal favorite? The milk chocolate ones with almonds.
- Sprinkle Some Love: Before baking, sprinkle the sugared dough balls with festive sprinkles! This is especially fun for holidays or birthday parties. Rainbow sprinkles are always a hit, but you can also use colored sugar or even edible glitter for extra sparkle!
- Chocolate Chip Surprise: Fold in some mini chocolate chips into the peanut butter dough for an extra dose of chocolatey goodness. I’m talkin’ semi-sweet, milk chocolate, or even white chocolate chips. Why not?!
Seriously, don’t be afraid to experiment! Baking is all about having fun and creating something delicious. So, go ahead and get creative with your peanut butter blossom cookies. I can’t wait to see what you come up with!
Frequently Asked Questions About Peanut Butter Blossom Cookies
Got questions? I got answers! Here are some of the most common questions I get about these yummy peanut butter blossom cookies:
- Why are my peanut butter blossom cookies flat? Okay, this is a big one! Usually, flat cookies mean your butter was too warm or you didn’t chill the dough long enough. Make sure your butter is *softened*, not melted, and give that dough some quality time in the fridge! Also, double-check your oven temp – if it’s too low, the cookies will spread before they set.
- Can I freeze peanut butter blossom cookies? You betcha! These cookies freeze beautifully. Just let them cool completely, then pop them in a freezer-safe container or bag. They’ll keep for up to 2-3 months. When you’re ready to eat them, just thaw them at room temperature. They’re almost as good as fresh!
- How do I prevent the Hershey Kiss from melting *too* much? This is a delicate balance! You want the Kiss to be soft enough to stick, but not so melty that it turns into a puddle. Make sure your cookies aren’t *too* hot when you press the Kisses in. If they’re melting too much, try letting the cookies cool for a few more minutes before adding the Kisses.
- How to make no bake peanut butter blossom cookies? Alright, this is a fun one! While *technically* these are a baked cookie, you *could* adapt a no-bake peanut butter cookie recipe (lots of those online!) and then stick a Hershey’s Kiss on top before the peanut butter sets. It won’t be the *same*, but it’ll satisfy that craving if you don’t want to turn on the oven!
Storing Your Peanut Butter Blossom Cookies
Alright, so you’ve baked up a batch of these beauties… and maybe you haven’t eaten them ALL in one sitting (I won’t judge if you did!). Here’s how to keep those peanut butter blossom cookies fresh and delicious!
For short-term storage (like, a few days), just pop them in an airtight container at room temperature. They’ll stay soft and chewy for about 3-4 days… if they last that long! I usually layer them in the container with parchment paper between the layers to prevent sticking. Nobody wants a cookie pile-up!
Want to keep them around even longer? Freezing is your friend! Let the cookies cool completely, then arrange them in a single layer on a baking sheet and freeze for about 30 minutes. This prevents them from sticking together when you put them in a container. Once they’re frozen solid, transfer them to a freezer-safe bag or container. They’ll keep for up to 2-3 months. When you’re ready to enjoy them, just thaw them at room temperature for about 30 minutes. They might not be *quite* as perfect as the day they were baked, but they’ll still be darn good!
Nutritional Information for Peanut Butter Blossom Cookies
Okay, let’s talk nutrition… but with a HUGE disclaimer! The nutritional information for these peanut butter blossom cookies can vary *a lot* depending on the specific brands and ingredients you use. I’m talkin’ different peanut butters, different butters, different sizes of Hershey’s Kisses… you get the idea!
So, I can’t give you an *exact* breakdown of calories, fat, sugar, etc. If you’re really concerned about the specifics, I recommend plugging your ingredients into a nutritional calculator online. There are tons of free ones out there!
Just keep in mind that these are cookies… a treat! Enjoy them in moderation, and savor every delicious bite. After all, life’s too short to worry *too* much about the calories in a peanut butter blossom cookie, right?!
Enjoyed These Peanut Butter Blossom Cookies?
Alright, y’all, I hope you loved this recipe as much as I do! If you gave these peanut butter blossom cookies a try, I wanna hear all about it! Did you switch up the Kisses? Add any fun sprinkles? Tell me everything in the comments below!
And hey, if you’re feeling extra generous, I’d be over the moon if you left a rating for this recipe! It helps other bakers find it and spread the peanut butter blossom love! Plus, don’t forget to snap a pic of your creations and share them on social media! Tag me – I’m @CaseyMitchellCooks – so I can see your amazing cookies!
So, what are you waiting for? Get baking, get sharing, and let’s make the world a little sweeter, one peanut butter blossom cookie at a time! What’s your favorite holiday to bake these for?

Sinful Peanut Butter Blossom Cookies: Just 8 Minutes
- Prep Time: 15 minutes
- Cook Time: 40 minutes
- Total Time: 55 minutes
- Yield: 6-8 servings 1x
- Category: Dessert
- Method: Baking
- Cuisine: American
- Diet: Vegetarian
Description
This sweet potato souffle is a crowd-pleasing dish perfect for holidays or any special occasion. It’s a delightful blend of sweet and savory flavors with a light and airy texture.
Ingredients
- 4 cups cooked and mashed sweet potatoes
- 1 cup granulated sugar
- 1/2 cup melted butter
- 1/2 cup milk
- 2 large eggs, beaten
- 1 teaspoon vanilla extract
- 1/2 teaspoon ground cinnamon
- 1/4 teaspoon ground nutmeg
- Pinch of salt
- Optional topping: 1/2 cup chopped pecans, 1/4 cup brown sugar, 2 tablespoons melted butter
Instructions
- Preheat oven to 350°F (175°C). Grease a 2-quart baking dish.
- In a large bowl, combine mashed sweet potatoes, sugar, melted butter, milk, eggs, vanilla extract, cinnamon, nutmeg, and salt. Mix well until smooth.
- Pour mixture into the prepared baking dish.
- If desired, prepare the topping by combining pecans, brown sugar, and melted butter in a small bowl. Sprinkle evenly over the sweet potato mixture.
- Bake for 30-40 minutes, or until set and lightly golden brown.
- Let cool slightly before serving.
Notes
- You can use canned sweet potatoes or fresh sweet potatoes that have been baked or boiled.
- Adjust the amount of sugar to your liking.
- For a smoother souffle, use an electric mixer to combine the ingredients.
- The souffle can be made ahead of time and refrigerated. Add 10-15 minutes to the baking time if baking from cold.
Nutrition
- Serving Size: 1 serving
- Calories: 300
- Sugar: 30g
- Sodium: 100mg
- Fat: 15g
- Saturated Fat: 8g
- Unsaturated Fat: 5g
- Trans Fat: 0g
- Carbohydrates: 40g
- Fiber: 3g
- Protein: 4g
- Cholesterol: 50mg