Okay, y’all, let’s talk Halloween! It’s my absolute *favorite* time of year, and that means it’s baking season in the Mitchell house. Every year, without fail, we whip up a batch (or three!) of these super fun spider web brownies. They’re seriously the perfect mix of spooky and sweet, and trust me, even the little goblins will gobble them right up!
What I love most is how EASY these are. We’re talking boxed brownie mix easy – yep, a total cheat! But don’t let that fool you; with a little white chocolate magic, they look like you spent hours. I promise, you’ll be the star of the Halloween party!
Why You’ll Love These Spider Web Brownies
- Seriously easy prep: I’m talking “dump, mix, and bake” kinda easy. Boxed brownie mix to the rescue!
- Spooky-fun design: That spider web design? Total showstopper. Everyone will think you’re a pastry chef (shhh, our little secret!).
- Rich, fudgy chocolate flavor: We’re starting with a classic brownie base, so you KNOW it’s gonna be good. Think deep, dark, and oh-so-chocolatey.
- Perfect for parties and potlucks: These spider web brownies are always a hit. Cut ’em into squares, and watch ’em disappear! They’re the ultimate crowd-pleaser.
- Totally customizable: Wanna add some spider sprinkles? Go for it! Feeling adventurous? Try different colors of chocolate for your web. The possibilities are endless!
Ingredients for Your Spider Web Brownies
Alright, let’s gather our goodies! Here’s exactly what you’ll need to whip up these spooky spider web brownies. Don’t worry, it’s a short and sweet list!
- 1 box (about 18-20 ounces) brownie mix: I usually grab the family-size Ghirardelli double chocolate, but honestly, any kind you love will work! Just make sure you also have whatever the box calls for – usually that’s oil, eggs, and water.
- 1/2 cup white chocolate chips: Go for the good stuff here! Ghirardelli or Guittard are my faves. They melt super smooth, which is key for that pretty web.
- 1 tablespoon milk: Any kind works – whole, 2%, even almond milk if you’re feeling fancy! This just helps the white chocolate get nice and melty.
- Black gel food coloring: Gel is *definitely* the way to go here! Liquid food coloring can mess with the chocolate’s consistency. Just a tiny drop is all you need for those creepy spider details.
Equipment You’ll Need
Okay, before we get started, let’s make sure we have all our tools handy. Ain’t nothin’ worse than realizing you’re missing something mid-bake! Here’s what you’ll need to make these spider web brownies a smashing success:
- Baking pan (9×13 inch): This is my go-to for sheet pan brownies. You can use an 8×8 if you want thicker brownies, just adjust the baking time a bit.
- Mixing bowl: Any ol’ bowl will do! Just make sure it’s big enough to hold all that brownie batter.
- Measuring cups and spoons: Gotta measure those ingredients, y’all! Precision is key (well, *kinda* key… I’m not always the best at measuring, haha!).
- Microwave-safe bowl: For melting that glorious white chocolate. Glass or ceramic works best.
- Piping bag or zip-top bag: This is how we’re gonna get that beautiful spider web design. If you don’t have a piping bag, a zip-top bag with a tiny corner snipped off works like a charm!
- Toothpick or skewer: Our secret weapon for creating those perfect spider web lines. A wooden skewer works great too, if you have one!
How to Make Spider Web Brownies: Step-by-Step Instructions
Alright, buckle up, buttercups! It’s time to turn that brownie mix into a Halloween masterpiece. Don’t worry, I’ll walk you through every step. Even if you’re a total newbie, you got this!
Prepare the Brownie Batter
First things first, let’s get that brownie batter ready! Follow the instructions on your box – usually, that means mixing the brownie mix with oil, eggs, and water. Whisk it all together until it’s smooth and luscious. Mmm, I can already smell the chocolatey goodness! Now, grease your 9×13 inch baking pan. I like to use cooking spray, but you can also butter it if you’re feeling old-school. Pour that batter in and spread it evenly. Easy peasy!
Bake the Spider Web Brownies
Okay, pop those babies into a preheated oven – usually around 350°F (175°C), but double-check your box instructions! Bake for the time listed on the box. Keep an eye on them, though! You want them to be fudgy, not dry. A toothpick inserted near the center should come out with moist crumbs attached. Now, this is *super* important: let those brownies COOL COMPLETELY. I know, it’s torture, but trust me. If you try to decorate them while they’re still warm, you’ll end up with a melty mess.
Melt the White Chocolate
While those brownies are cooling (patiently, I hope!), let’s melt our white chocolate. Pop those white chocolate chips and milk into a microwave-safe bowl. Microwave in 30-second intervals, stirring like crazy in between, until it’s smooth as silk. Careful not to burn it! White chocolate can be a little temperamental. If it seizes up, try adding a tiny bit more milk and stirring like your life depends on it. Usually does the trick for me!
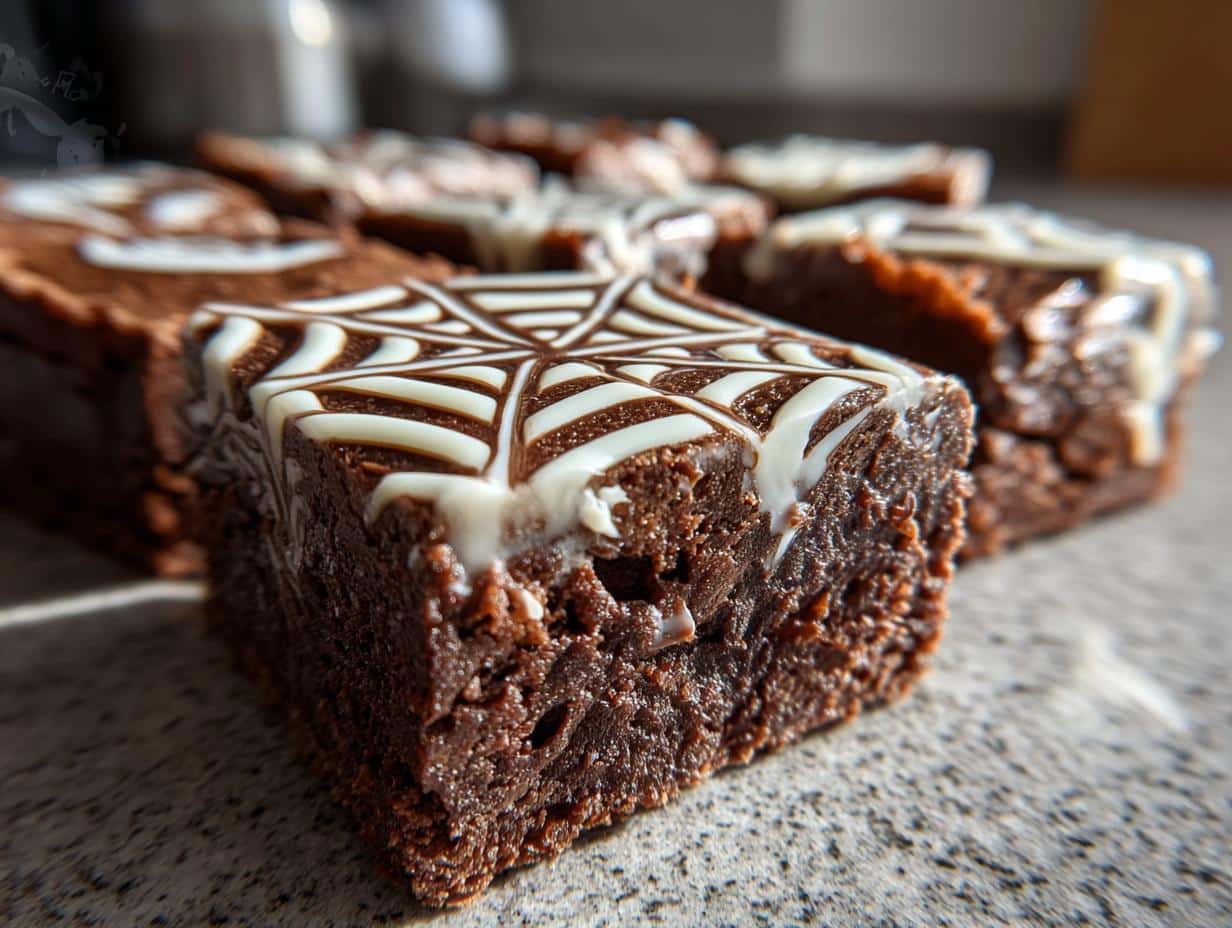
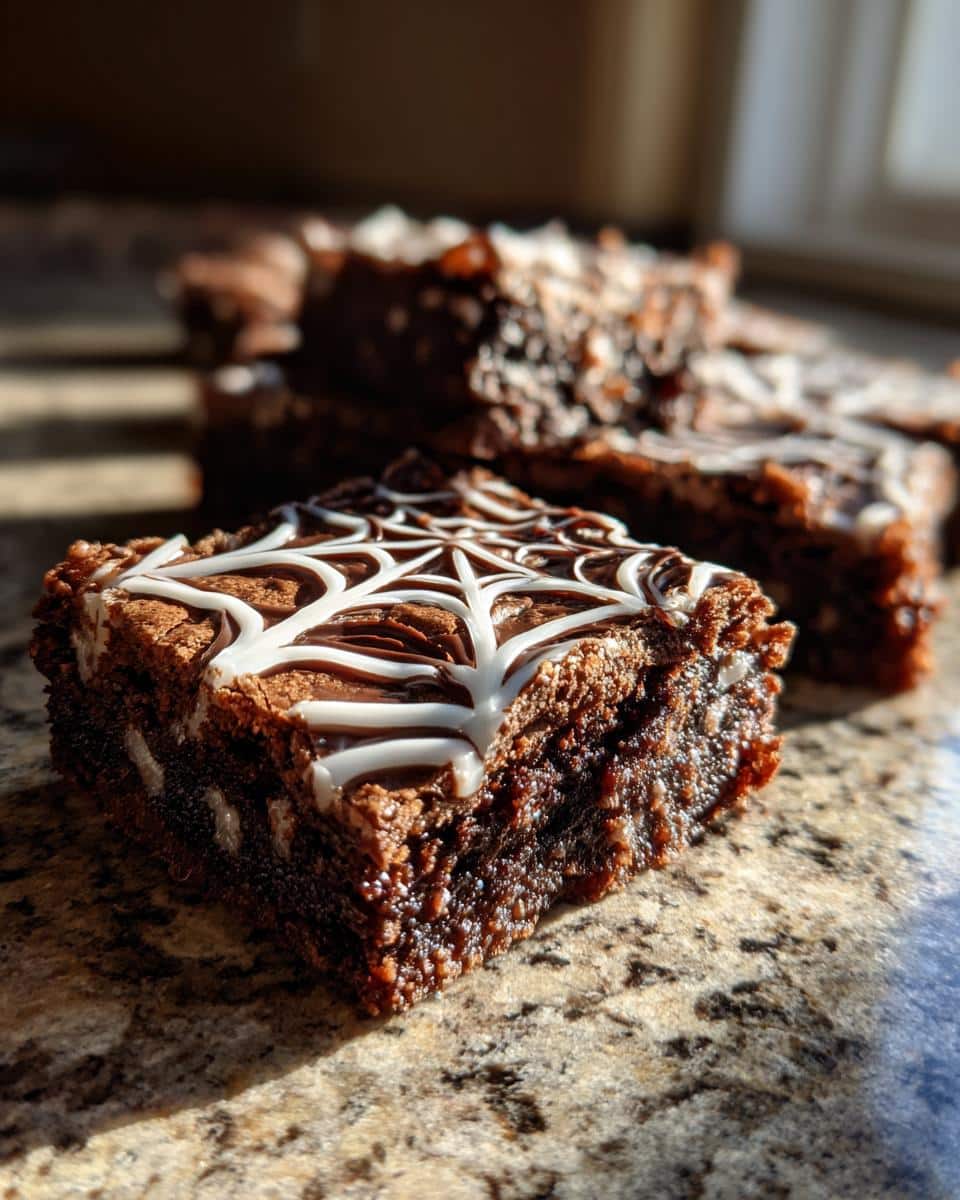
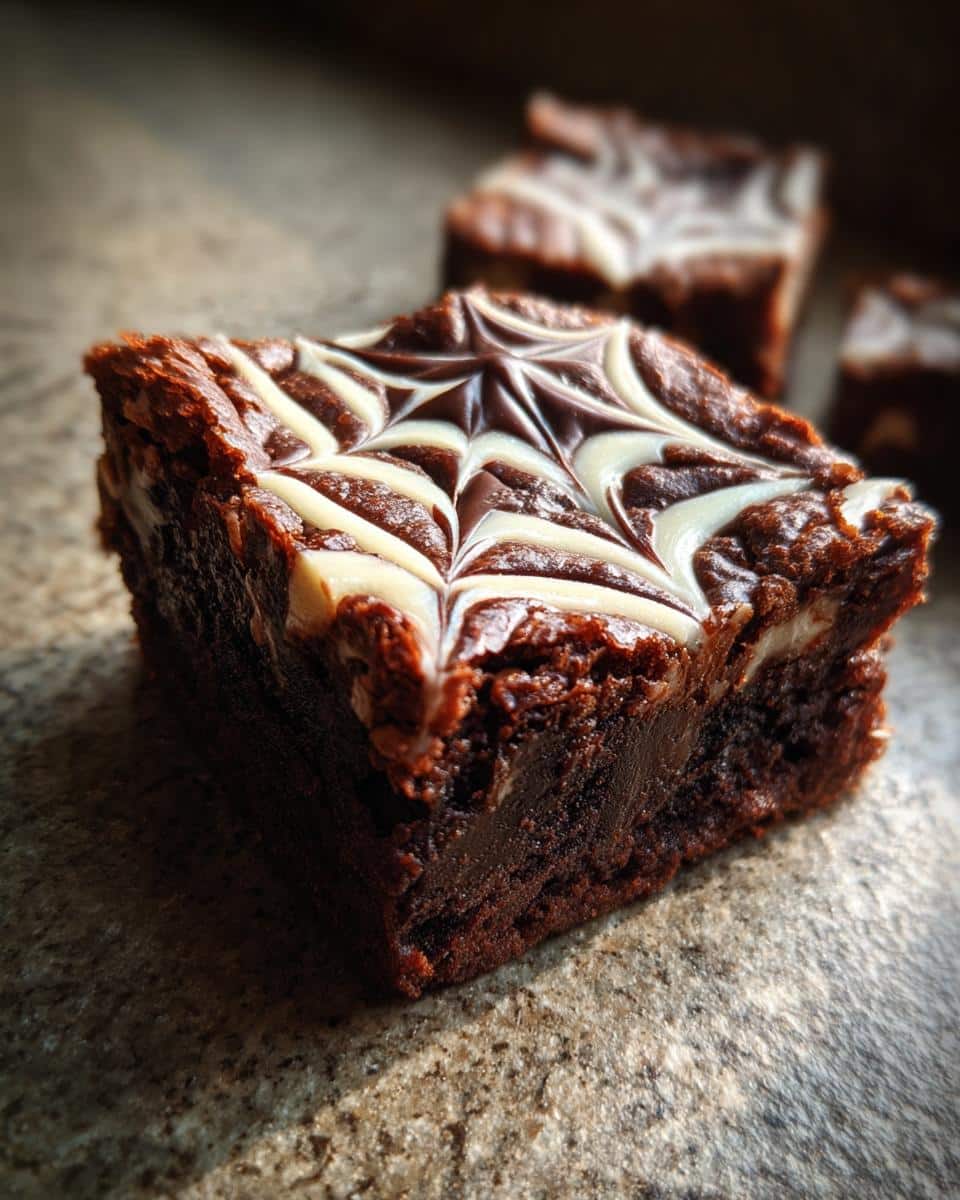
Create the Spider Web Design
This is where the magic happens! Pour that melted white chocolate into a piping bag or a zip-top bag with a tiny corner snipped off. Gently pipe concentric circles of white chocolate on top of your cooled brownies. Don’t worry about being perfect – a little wabi-sabi is totally okay! Now, grab your toothpick or skewer and drag it through the white chocolate, starting from the center and pulling outwards. Repeat all the way around to create that awesome spider web effect! For extra spookiness, add a tiny drop of black gel food coloring to some leftover melted white chocolate and create little spider shapes. Eek!
Setting and Serving Your Spider Web Brownies
Alright, now comes the *final* test of patience: let that chocolate set! This usually takes about 30 minutes at room temperature, but if you’re impatient (like me!), you can pop them in the fridge for a bit to speed things up. Once the chocolate is firm, cut those brownies into squares and prepare for some serious “oohs” and “aahs”! These spider web brownies are best served with a big glass of milk… or maybe a witch’s brew? 😉
Tips for Perfect Spider Web Brownies
Okay, before you dive in, let me share a few secrets to making these spider web brownies *extra* amazing. These are the little things I’ve learned over the years that really make a difference!
- Smooth white chocolate is key: Seriously, if your white chocolate is lumpy or too thick, that web ain’t gonna look so hot. Make sure it’s melted *just* right – no scorching allowed! Add a tiny bit more milk if needed.
- Warm toothpick for cleaner lines: This is a game-changer! Run your toothpick under warm water and dry it off before dragging it through the chocolate. It’ll glide through like butter and create super clean lines. Trust me on this one!
- Don’t overbake those brownies! Fudgy is the name of the game, y’all. Overbaked brownies are dry and crumbly, and nobody wants that. Keep a close eye on them in the oven and pull them out when a toothpick comes out with moist crumbs.
- Piping bag pro-tip: If you’re using a zip-top bag, squeeze out *all* the air before you start piping. This will give you more control and prevent the chocolate from splattering everywhere. Oops, been there, done that! 🤪
- Let the brownies cool completely – again!: I know, I know, I already said it. But seriously, warm brownies + melty chocolate = disaster. Patience, grasshopper!
Spider Web Brownies Variations
Okay, so you’ve mastered the classic spider web brownie… now what? Time to get creative, y’all! These are just a few ideas to get your spooky juices flowing – feel free to mix and match, or come up with your own crazy concoctions!
- Rainbow Web: Swap out the white chocolate for different colors of candy melts! Think orange, purple, green… the more colorful, the better! This is a fun way to make them less spooky and more… festive? Haha!
- Spider Sprinkles Galore!: After you create your web, sprinkle some spider sprinkles on top! You can find these at most craft stores or online. It’s a super easy way to add some extra creepy crawly fun. My kids LOVE this one!
- Black Cocoa Brownies: Want a super dark, intense chocolate flavor? Use black cocoa powder in your brownie mix! It’ll give your brownies a deep, almost black color that’s perfect for Halloween. Just substitute a few tablespoons of regular cocoa powder with black cocoa. Careful, it’s potent stuff!
- Cream Cheese Web Brownies: Oooh, this one’s fancy! Swirl a cream cheese mixture into your brownie batter *before* baking. Then, use melted chocolate to create your spider web design on top. The tangy cream cheese adds a whole new level of deliciousness. To make the cream cheese swirl, just mix 4 ounces of softened cream cheese with 1/4 cup of sugar and a splash of vanilla extract. YUM!
- White Chocolate Web with Dark Chocolate Drizzle: Instead of a white chocolate web, use melted dark chocolate for the web design. It creates a really striking contrast against the brownie. Then drizzle a little melted white chocolate over the top for extra flair!
Storing Your Delicious Spider Web Brownies
Okay, so you’ve made a batch of these amazing spider web brownies… and somehow, you have leftovers?! Wow, you have more willpower than I do! 😉 Don’t worry, I’ve got you covered on how to keep those babies fresh and delicious.
The best way to store your spider web brownies is in an airtight container at room temperature. They’ll stay nice and fudgy for about 3-4 days. Trust me, they won’t last much longer than that – they’re just too good! If you live in a super warm or humid climate, you *can* store them in the fridge, but they might dry out a bit. Just let them come to room temperature before you dig in.
Oh, and a little tip: if you’re layering the brownies in your container, put a piece of parchment paper between the layers to keep the chocolate web from sticking. Nobody wants a smudged spider web, right?
Spider Web Brownies: Frequently Asked Questions
Got questions about these spider web brownies? I got answers! Here are a few of the most common things folks ask me. If you’re still scratching your head, drop a comment below – I’m always happy to help!
Can I use a different type of chocolate for the web? Absolutely! White chocolate is classic, but milk chocolate or dark chocolate would be delicious too! You could even use candy melts for a super colorful web. Get creative with it!
Can I make these Halloween dessert squares ahead of time? You betcha! The brownies themselves can be baked a day or two in advance. Just wait to add the spider web design until you’re ready to serve ’em. That way, the white chocolate web stays nice and crisp.
Can I use a homemade brownie recipe instead of a boxed mix for my spider web brownies? Of course! If you have a favorite fudgy brownie recipe, go for it! Just make sure it’s a recipe that bakes well in a 9×13 inch pan. Black cocoa brownies would be amazing!
What if my white chocolate is too thick to pipe? No worries, it happens! Just add a tiny bit more milk (like, a teaspoon at a time) and stir until it’s smooth and pourable. You want it to be thin enough to pipe easily, but not so thin that it’s watery.
Can I freeze these spider web brownies? Yep! Wrap them tightly in plastic wrap and then in foil, and they’ll keep in the freezer for up to 2-3 months. Just let them thaw completely at room temperature before serving. The white chocolate web might not be quite as perfect after freezing, but they’ll still taste amazing!
Spider Web Brownies Recipe: Nutritional Information
Okay, so you’re probably wondering about the nutrition info for these spider web brownies, right? I get it! But heads up, y’all: I’m just a home cook, not a nutritionist! So, the info below is just an estimate. It can vary *a lot* depending on the exact brownie mix and white chocolate you use. I’m not providing this precisely.
Enjoy these fudgy halloween brownies in moderation, okay? 😉
Rate This Spider Web Brownies Recipe
Okay, y’all, I poured my heart and soul into this spider web brownies recipe, so I *really* wanna know what you think! If you give these a try, please, please leave a comment below and let me know how they turned out. Did you love ’em? Did you tweak ’em? I wanna hear it all!
And while you’re at it, give the recipe a little rating – those stars are there for a reason! 😉 Your feedback helps other bakers find this recipe and make their own Halloween magic. Oh, and if you snap any photos of your spooky creations, be sure to share them on social media and tag me! I’m @CaseyMitchellCooks on Instagram and Facebook. I just LOVE seeing your versions of my recipes!
Happy baking, y’all! ❤️
Print
Ghastly Spider Web Brownies: A 1-Bowl Halloween Treat
- Prep Time: 15 minutes
- Cook Time: 30 minutes
- Total Time: 45 minutes
- Yield: 16 brownies 1x
- Category: Dessert
- Method: Baking
- Cuisine: American
- Diet: Vegetarian
Description
Enjoy these spooky and delicious spider web brownies. Perfect for Halloween or any fun occasion, these treats combine rich chocolate flavor with a festive spider web design.
Ingredients
- 1 box brownie mix (plus ingredients called for on the box)
- 1/2 cup white chocolate chips
- 1 tablespoon milk
- Black gel food coloring
Instructions
- Prepare brownie mix according to package directions.
- Pour batter into a greased baking pan and bake as directed.
- Let brownies cool completely.
- Melt white chocolate chips with milk in the microwave in 30-second intervals, stirring until smooth.
- Transfer melted white chocolate to a piping bag or a zip-top bag with a small corner cut off.
- Pipe concentric circles of white chocolate on top of the cooled brownies.
- Use a toothpick or skewer to drag lines from the center outwards to create a spider web effect.
- Add a drop of black gel food coloring to some melted white chocolate to create small spiders if desired.
- Let the chocolate set before cutting and serving.
Notes
- For easier piping, ensure the melted white chocolate is smooth and not too thick.
- You can use different colors of chocolate for a unique web design.
- Store leftover brownies in an airtight container at room temperature.
Nutrition
- Serving Size: 1 brownie
- Calories: 250
- Sugar: 30g
- Sodium: 150mg
- Fat: 12g
- Saturated Fat: 7g
- Unsaturated Fat: 4g
- Trans Fat: 0g
- Carbohydrates: 35g
- Fiber: 1g
- Protein: 2g
- Cholesterol: 10mg