
Thanksgiving, right? It’s like, the ultimate food holiday! And while the turkey gets all the glory, let’s be real – those thanksgiving desserts are where the *real* magic happens. I mean, who doesn’t sneak a peek at the dessert table before even grabbing their dinner plate? Guilty! Every year, our family has this tradition: my grandma makes her famous pumpkin pie (the *real* star!), and I try to come up with something new and equally amazing. But, you know, easy. Because, hello, Thanksgiving is already chaotic enough!
That’s why I’m SO excited to share these super simple thanksgiving desserts with you. Seriously, these are recipes that even *I* can’t mess up (and trust me, I’ve had my share of baking fails!). We’re talking minimal effort, maximum flavor, and guaranteed crowd-pleasers. From classic pies to no-bake wonders, get ready to wow your family without spending all day in the kitchen. These recipes are tried and true, tweaked and perfected over years of holiday baking. I promise, they’ll become a new tradition!
Why You’ll Love These Thanksgiving Desserts
Okay, seriously, why *won’t* you love them? But just in case you need convincing, here’s the lowdown:
- Super easy to make – even if you’re a total beginner!
- Seriously delicious flavors that scream Thanksgiving.
- Guaranteed crowd-pleasers – even picky eaters will gobble them up (see what I did there?).
- Perfect for a festive meal – they just *look* the part, you know?
Quick and Easy Thanksgiving Desserts
Time is precious on Thanksgiving! These recipes are designed to be quick, so you can spend less time baking and more time with family (or watching football – no judgment!).
Crowd-Pleasing Thanksgiving Desserts
Worried about pleasing everyone? Don’t be! These thanksgiving desserts have been tested and approved by even the *fussiest* eaters. There’s something for everyone!
Key Ingredients for Delicious Thanksgiving Desserts
Alright, let’s talk ingredients! These are the all-stars of our easy pumpkin pie – the stuff that makes it taste like a cozy Thanksgiving hug. Don’t skimp on quality here; it really makes a difference!
- Pumpkin puree: 15 ounces. Make sure it’s *puree*, not pumpkin pie filling! We want that pure pumpkin goodness.
- Sweetened condensed milk: 14 ounces. This is the magic ingredient that makes it so creamy and dreamy.
- Eggs: 2 large. They bind everything together, so don’t forget ’em!
- Pumpkin pie spice: 1 teaspoon. This is where all the warm, cozy flavors come from. If you don’t have any, you can mix cinnamon, ginger, nutmeg, and cloves.
- Vanilla extract: 1 teaspoon. Adds a little extra somethin’ somethin’. Trust me!
- Graham cracker crust: 9-inch. You can totally use a store-bought one to save time (no shame!), or make your own if you’re feeling ambitious.
How to Make Easy Thanksgiving Desserts: Step-by-Step Instructions
Okay, ready to get baking? Don’t worry, it’s easier than you think! Just follow these simple steps, and you’ll have a delicious thanksgiving dessert in no time. Seriously, even *I* can do this!
Preparing the Pumpkin Filling for Your Thanksgiving Desserts
First things first, let’s get that pumpkin filling ready! Grab a big bowl – the biggest one you’ve got – and dump in the pumpkin puree, sweetened condensed milk, eggs, pumpkin pie spice, and vanilla extract. Now, mix it all together! You’ll want to mix it really well, until it’s smooth and creamy. Don’t worry if there are a few little lumps at first; just keep stirring. Trust me, it’ll come together. My secret? I use a whisk – it gets everything super smooth. But a spoon works just fine too!
Baking Your Thanksgiving Pumpkin Pie
Alright, now for the fun part! Before you even *think* about pouring that filling into the crust, make sure your oven is preheated to 350°F (175°C). This is super important, so don’t skip it! Once the oven’s ready, gently pour the pumpkin mixture into your graham cracker crust. Be careful not to overfill it! Now, pop it in the oven and bake for 50-55 minutes. How do you know when it’s done? The filling should be set, but still have a little wiggle in the center. Don’t worry, it’ll firm up as it cools. Oh, and careful when you open the oven – it’s hot in there!
Cooling and Serving Your Thanksgiving Dessert
Patience, my friend! This is the hardest part, but it’s crucial. Once the pie is out of the oven, let it cool *completely* before serving. I know, it’s tempting to dig in right away, but trust me, it’s worth the wait. Once it’s cooled, pop it in the fridge for at least 2 hours. This will help it set up even more and make it even more delicious. And when you’re *finally* ready to serve, add a dollop of whipped cream (because, why not?) and maybe a sprinkle of chopped pecans or walnuts. Enjoy your amazing thanksgiving dessert!
Tips for Perfect Thanksgiving Desserts
Want to take your thanksgiving desserts from good to GORGEOUS? Here are a few of my tried-and-true tricks. Seriously, these little tips make a HUGE difference!
- Don’t overbake! This is key to avoiding a dry, cracked pie.
- Use high-quality ingredients. It really *does* make a difference in flavor.
- Let it cool completely! I know, it’s hard, but it’s essential for a firm, sliceable pie.
Avoiding Common Mistakes When Making Thanksgiving Desserts
Soggy crust? Cracked filling? NO THANKS! Here’s the deal: to avoid a soggy crust, blind bake it for a few minutes before adding the filling (just poke some holes in the bottom with a fork first!). And for a perfectly smooth filling, don’t overbake it! A little wiggle in the center is a *good* thing.
Thanksgiving Desserts: Ingredient Notes and Substitutions
Okay, so maybe you’re missing an ingredient or you’ve got some dietary restrictions. No sweat! Here’s the lowdown on swaps and substitutions to keep your thanksgiving desserts dreams alive!
Gluten-Free Thanksgiving Desserts Options
Gluten-free friends, I got you! Just swap out that graham cracker crust for a gluten-free version. You can find them at most grocery stores, or even make your own with gluten-free graham crackers or almond flour. Easy peasy!
Dairy-Free Thanksgiving Desserts Adaptations
Dairy-free? No problem! Just swap out the sweetened condensed milk for a dairy-free version (they make those now, wow!). You can also use a coconut milk-based whipped cream on top. Seriously, nobody will even know the difference!
Variations on These Thanksgiving Desserts
Okay, so you’ve mastered the basic pumpkin pie. Now what? Let’s get crazy! Here are some fun ways to mix things up and make these thanksgiving desserts totally your own!
Mini Thanksgiving Desserts: Individual Servings
Wanna get fancy? Make mini pies! Just grab some mini graham cracker crusts (you can find them at most grocery stores) and fill ’em up with the pumpkin mixture. Bake for about 25-30 minutes, or until set. They’re SO cute and perfect for portion control (ha!). Plus, everyone gets their own little pie – no sharing required!
No-Bake Thanksgiving Desserts Variation
No oven? No problem! You can totally make this a no-bake thanksgiving dessert. Just mix the pumpkin filling with a packet of softened cream cheese (about 8 ounces) and pour it into your graham cracker crust. Chill in the fridge for at least 4 hours, or until set. It’s like a pumpkin cheesecake – yum!
Serving Suggestions for Your Thanksgiving Desserts
Okay, your thanksgiving desserts are ready… but what do you serve with them? A dollop of whipped cream is a MUST, obviously. But ice cream is also amazing – especially vanilla or cinnamon! And a warm cup of coffee or tea? Perfection! Honestly, anything goes. Just dig in and enjoy!
Storing Your Thanksgiving Desserts
Leftovers? If you’re lucky enough to *have* any, store them in an airtight container in the refrigerator. They’ll keep for about 3-4 days. But let’s be honest, they probably won’t last that long!
Thanksgiving Desserts FAQs
Got questions? I’ve got answers! Here are a few of the most common things people ask me about these thanksgiving desserts. Don’t be shy – if you’ve got a burning question, drop it in the comments!
Can I Prepare Thanksgiving Desserts in Advance?
YES! A thousand times yes! In fact, I *highly* recommend it. This pumpkin pie is even better the next day, after the flavors have had a chance to meld together. Just bake it a day or two ahead of time, let it cool completely, and store it in the fridge. Boom! Thanksgiving prep win!
How Long Will These Thanksgiving Desserts Last?
Okay, so technically, this pumpkin pie will last for about 3-4 days in the fridge. *But*, in my experience, it’s usually gone way before then! Seriously, it’s like magic – it just disappears! But yeah, for food safety, stick to the 3-4 day rule. If you want it to last longer, freezing is your best bet.
Estimated Nutritional Information for Thanksgiving Desserts
Okay, let’s talk numbers! Now, I’m no nutritionist, so this is just a rough estimate, okay? But generally speaking, one slice of this pumpkin pie is gonna clock in at around 300 calories. You’re also looking at about 15 grams of fat, 5 grams of protein, and 35 grams of carbs. And yeah, there’s sugar in there – about 25 grams. Hey, it’s a thanksgiving dessert, after all! But remember, this is just an estimate, and it can vary depending on the specific ingredients you use. Just enjoy it, and don’t sweat the small stuff!
Enjoy Your Thanksgiving Desserts!
Alright, my friend, you’re all set to rock your Thanksgiving dessert table! I really hope you love these recipes as much as my family does. Now, go forth and bake! And hey, if you try them out, pretty please come back and leave a comment? I’d love to hear how they turned out! Oh, and don’t forget to rate the recipe – that helps other people find it! And if you’re feeling extra generous, share a pic on social media and tag me! Happy Thanksgiving!
Print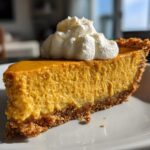
Thanksgiving Desserts: 6 Ingredients to Irresistible Joy
- Prep Time: 10 minutes
- Cook Time: 55 minutes
- Total Time: 3 hours 5 minutes
- Yield: 8 servings
- Category: Dessert
- Method: Baking
- Cuisine: American
- Diet: Vegetarian
Description
Find easy and delicious Thanksgiving dessert recipes. Explore pies, cheesecakes, and no-bake options for your holiday feast.
Ingredients
- Pumpkin puree: 15 ounces
- Sweetened condensed milk: 14 ounces
- Eggs: 2 large
- Pumpkin pie spice: 1 teaspoon
- Vanilla extract: 1 teaspoon
- Graham cracker crust: 9-inch
Instructions
- Preheat oven to 350°F (175°C).
- In a large bowl, combine pumpkin puree, sweetened condensed milk, eggs, pumpkin pie spice, and vanilla extract. Mix well.
- Pour mixture into graham cracker crust.
- Bake for 50-55 minutes, or until set.
- Let cool completely before serving. Refrigerate for at least 2 hours.
Notes
- Add a dollop of whipped cream before serving.
- Sprinkle with chopped pecans or walnuts.
- Use a store-bought or homemade graham cracker crust.
Nutrition
- Serving Size: 1 slice
- Calories: 300
- Sugar: 25g
- Sodium: 200mg
- Fat: 15g
- Saturated Fat: 8g
- Unsaturated Fat: 5g
- Trans Fat: 0g
- Carbohydrates: 35g
- Fiber: 1g
- Protein: 5g
- Cholesterol: 50mg